
The Atomic S/MC

A few years back, I built a bench that ended up becoming a bit of a thing. It was called the Atomic BF/MFT—basically my own oversized take on the Festool MFT. I wanted something that could handle full sheet goods, offer endless clamping options, and stand up to just about anything I threw at it. It worked. People took notice. I ended up building a few for friends, and over time, hundreds of others followed suit with their own versions. Of all the things I’ve built, it’s probably been the most productive and efficient tool in my shop.

But woodworking has always been more of a hobby for me—a way to unwind. My real passion lives in the garage, buried under layers of grease and history: traditional hot rods and early Porsche race cars. And while the BF/MFT often pulls double duty as a mechanic’s bench, I started to feel the need for something smaller. Something more nimble. Something I could roll right up to the car without it getting in the way.

So I built one.

I call it the Atomic S/MC—short for Small Mechanics Cart. I filmed the entire build process, but as I started editing the footage, it became clear it was basically a mini version of the BF/MFT build. Rather than repeat myself, I figured I’d focus on what makes this thing different.

It starts with size. The S/MC measures 36 inches wide by 17 inches deep, and stands 35 3/16 inches tall—same height as the BF/MFT. I landed on those dimensions after a year of testing a rough prototype. I needed something narrow enough to fit between open doors and quarter panels, but still long enough to offer real working space. The result is something surprisingly versatile. It fits where I need it to go, but never feels cramped.

And yeah—I got a little carried away with the casters. They’re 4-inch units scavenged from a hospital gurney, chosen because they roll over power cords and air lines like they’re not even there. Zero friction, zero frustration.

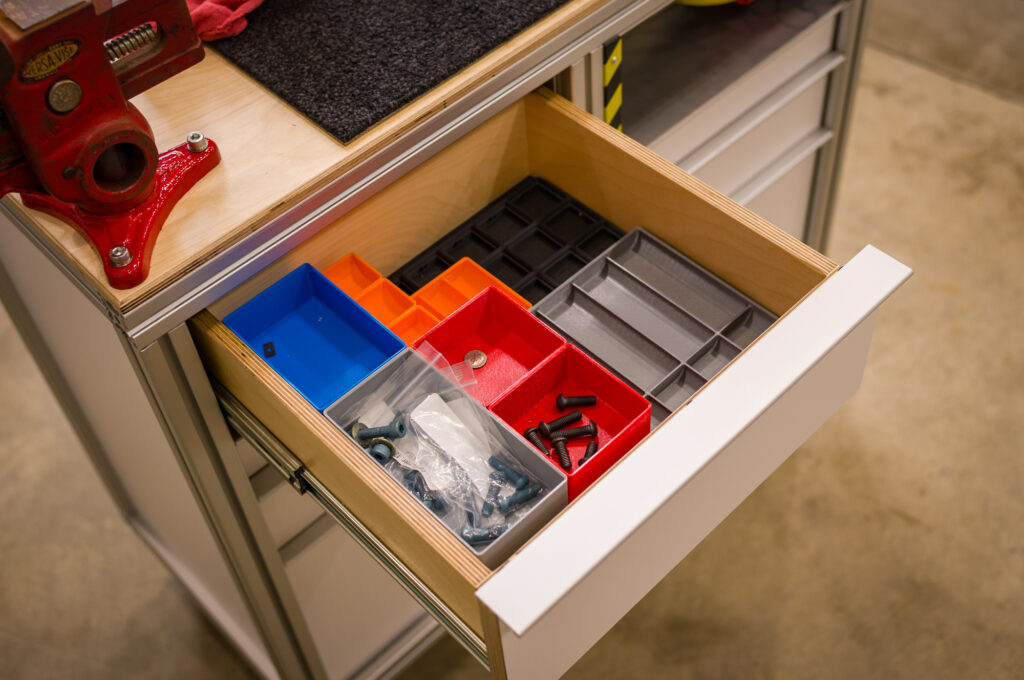
The drawers mimic those in the BF/MFT, but they’re outfitted for quick access—just the tools I constantly need, plus a few dedicated accessories. One of the stars of the system is Gridfinity. If you’re not familiar, it’s a modular bin system that uses a gridded base to keep things organized. I use it for all the little stuff—nuts, bolts, washers—and also for organizing smaller tools. I’m still sorting out what deserves a permanent home in the cart, but honestly, that’s half the fun.
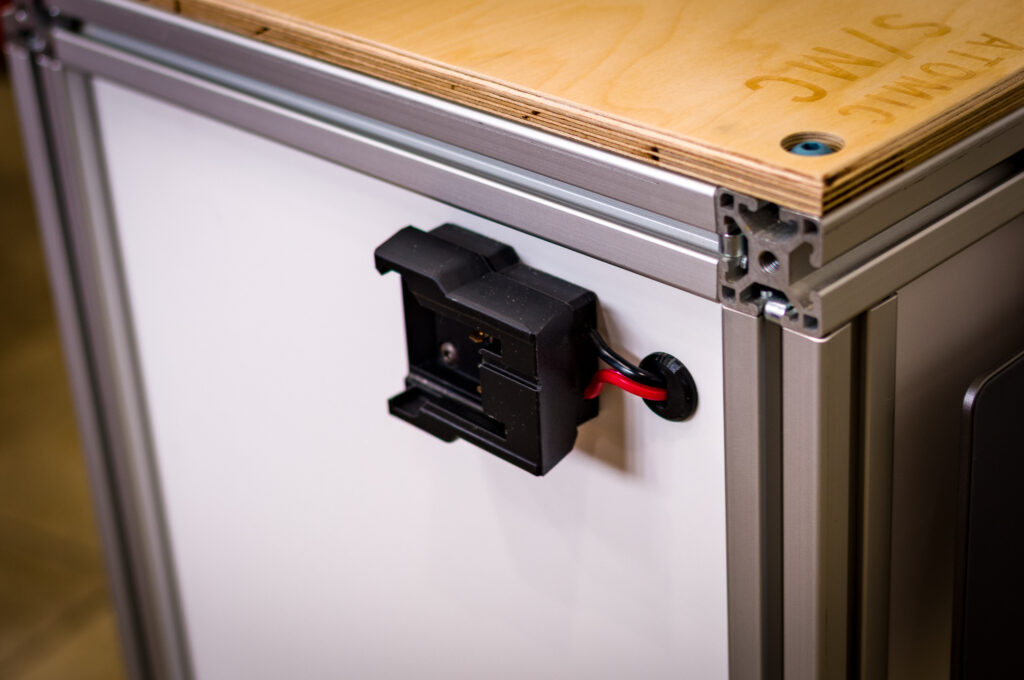
You’ll notice one drawer slot is missing. That’s where I built in a power center, anchored by a Milwaukee M18 inverter. I relocated the battery to the side panel with a 3D-printed bracket, so now power runs from the battery, through the inverter, and out to a handful of outlets and USB-C ports around the bench. That powers everything from my iPad to a task light—more on that in a second.
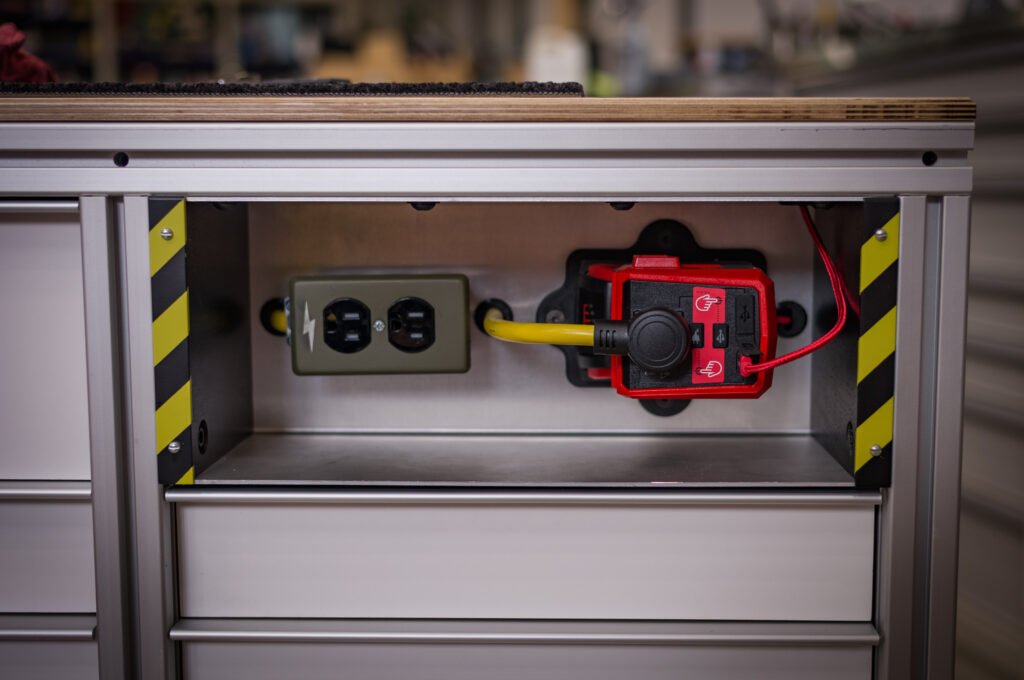
Why a powered cart? Easy. I wanted to be able to use things like my soldering iron without dragging extension cords across the shop. Also, I had a nice piece of aluminum plate collecting dust and needed an excuse to use it. A few printed grommets, a hacked extension cord, and suddenly I had something that looked way more polished than it had any right to be. And it works—so far I haven’t drained a single HD12.0 battery in less than a full day.
Originally, I envisioned the bench with a ½” aluminum top. That didn’t happen—aluminum prices exploded halfway through the project. Instead, a friend-of-a-friend who runs a skateboard factory handed me a sheet of ½” hickory, easily the hardest plywood I’ve ever dealt with. I laminated that to ¾” birch, CNC’d it to fit, and now I’ve got a vacuum-fit 1.25” thick top with a clean ½” lip around the edge. It wasn’t what I planned, but it’s worked out beautifully. One day I might still go aluminum, but for now? No complaints.

Now for the extras.

Because I spend a lot of time working on old Porsches and referencing service manuals, I added an iPad mount. I couldn’t afford the paper versions, so PDFs have become my go-to. The mount itself is just a modified aluminum desktop stand, bolted to the 80/20 frame. Simple. Super functional.
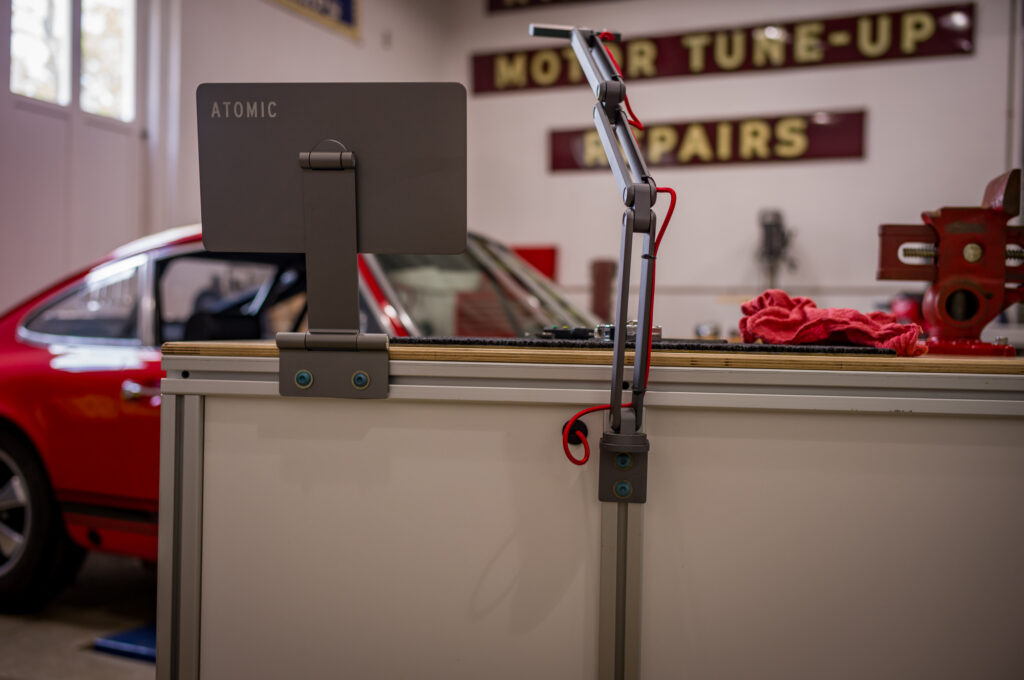
Lighting? That’s handled by a repurposed aluminum mic stand. It already had a ¼-20 thread on the end, so I attached a USB-C powered video light. The setup lets me position the light exactly where I need it and adjust both the brightness and color temperature. It has its own internal battery, but when that runs low, the M18 system charges it right back up.

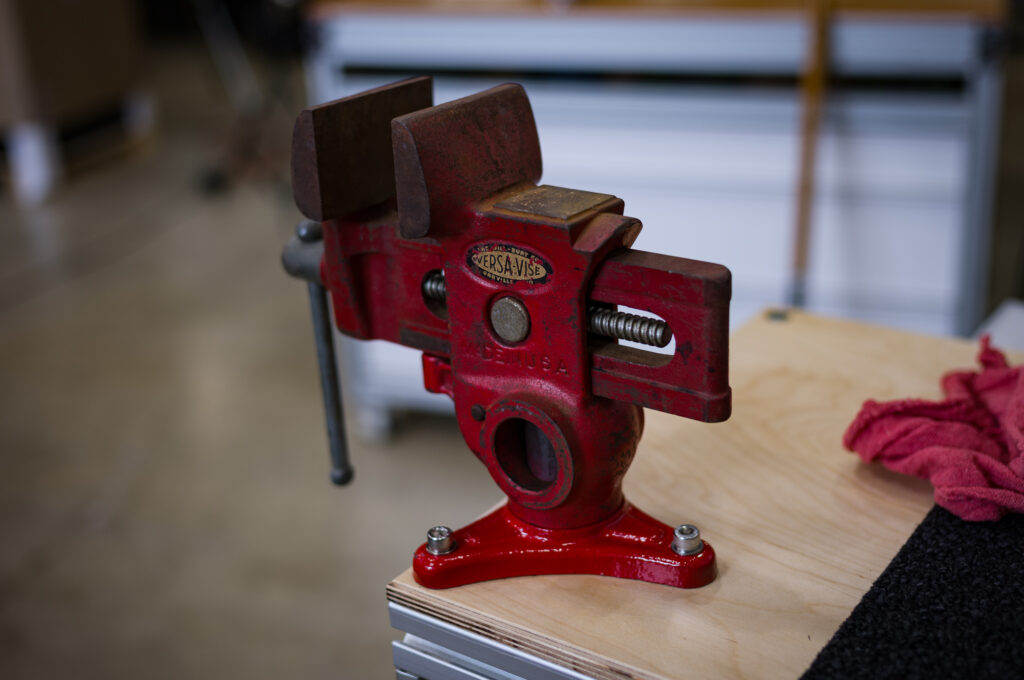
And then there’s the vise—a gift from a Garage Journal user. It’s a very early Versa Vise. It needs a full restoration, but even in its current state, it’s fantastic. Lightweight, fully adjustable, and perfect as a third hand. When I don’t need it, it pops off its mount and slides neatly into one of the drawers.
Actually, everything on the bench stows away. That was intentional. Since the S/MC matches the height of the BF/MFT, I can use it as an extension when I need to. But more importantly, I wanted the option to roll it out of the way entirely. When I’m done, the cart slides under a bench and disappears. No clutter. No footprint.

So yeah—that’s the Atomic S/MC. I’ve been using it for a few weeks now, and it’s been exactly what I hoped for. Completely unnecessary… and absolutely worth it. If you’re curious about the details or want plans, just reach out… I’m working on putting together a package with all of my .STL files as well as some plans. In the meantime, here’s a quick rundown of the parts I used:

Extruded Aluminum: I used Parco Inc this time. 40-series. They were affordable and even did all the machining for me… Saved me a ton of time.

iPad Stand: Cheap and shitty… I cut off a part of the base, drilled some holes and mounted it to the side extrusion of the bench. The one I used is no longer available, but this one is similar.

Mic Stand: This is what I used to mount the light. Again, it was surplus in my lab… But it’s made well and infinitely adjustable.

Light: I’ve owned this unit for years and have used it quite a bit. Fantastic light for all sorts of purposes… Plus, it’s tiny and absurdly light.

Milwaukee M18 Inverter: Got mine here. These are pretty great…

VERY SPECIAL THANKS TO: Justin Blevins for all of the help with the M18 inverter STLs. You can find his work here.

***

And that’s about all I can think of at the moment as far as parts go… If you have any questions, just fire away and I’ll add to the list if anything else comes up.

Also, if you build one of these – I wanna know about it!
Outlawmws

Well-known member
Joined
Aug 9, 2011
Messages
39,019
Location
The Badlands
Cool project Ryan!

What would be perfect for the Versa-Vise is the pop up flush bench mount for the base. Rare and hard to find.
 

Odessaboots

Member
Joined
May 31, 2020
Messages
11
Location
Arroyo Grande, CA
Can you provide more details on the remote battery connection? I assume it is a 3D printed part on both ends, with the wiring simply moving the current from the battery to the inverter - was that a custom design or did you purchase it? I would love to replicate that function but a bit lost on how that wiring was done.

Thanks!
 
OP
R

Ryan

Administrator
Staff member
Joined
Jan 26, 2006
Messages
5,688
Location
Texas/Hawaii
Can you provide more details on the remote battery connection? I assume it is a 3D printed part on both ends, with the wiring simply moving the current from the battery to the inverter - was that a custom design or did you purchase it? I would love to replicate that function but a bit lost on how that wiring was done.

Thanks!

Yes, 3D printed both parts - one for the battery and the other for the inverter. That's the one STL I can't give out... I don't wanna be held accountable if someone burns their house down.

BUT, I think people sell the same kind of thing on Etsy...
 

Outlawmws

Well-known member
Joined
Aug 9, 2011
Messages
39,019
Location
The Badlands
I've been looking for one for over a year... I'd love to have one.
I think it would be fairly easy to fab one 1-1/2" DOM tubing is easy to get, another with that ID, and plate with a hole in it...

I don't currently have a suitable bench for that, or I'd ahve made one, but there is is..
 

Odessaboots

Member
Joined
May 31, 2020
Messages
11
Location
Arroyo Grande, CA
Yes, 3D printed both parts - one for the battery and the other for the inverter. That's the one STL I can't give out... I don't wanna be held accountable if someone burns their house down.

BUT, I think people sell the same kind of thing on Etsy...
The battery side adapter I have a good print for, its the side that attaches to the inverter where I am a bit lost. It looks like you have your wire running into one of those generic "build-your-own" M18 battery cases, so is that wired into the PCB somehow and then you mount that to your 3D print? The M18 diagram shows tabs for intermediate voltages, so curious how you got the pos/neg from the custom adapter to play nicely going into the inverter. Any light you can shed would be appreciated.

BTW, your entire cart is cause for envy, it's just I have a use for the clever remote battery part for a project of my own at the moment.

Gridfinity has also changed my life for the better (and my wife's but she doesn't know what it is called, just that our entire kitchen is so well organized now...), super cool to see it in use in your shop too.

Keep up the inspiring work!
 
OP
R

Ryan

Administrator
Staff member
Joined
Jan 26, 2006
Messages
5,688
Location
Texas/Hawaii
The battery side adapter I have a good print for, its the side that attaches to the inverter where I am a bit lost. It looks like you have your wire running into one of those generic "build-your-own" M18 battery cases, so is that wired into the PCB somehow and then you mount that to your 3D print? The M18 diagram shows tabs for intermediate voltages, so curious how you got the pos/neg from the custom adapter to play nicely going into the inverter. Any light you can shed would be appreciated.

BTW, your entire cart is cause for envy, it's just I have a use for the clever remote battery part for a project of my own at the moment.

Gridfinity has also changed my life for the better (and my wife's but she doesn't know what it is called, just that our entire kitchen is so well organized now...), super cool to see it in use in your shop too.

Keep up the inspiring work!

Yes! I totally forgot about using half a fake m18 battery case. This thing went together almost 2 years ago… I believe I have all the details in my shop. I’ll dig em out tomorrow.
 
To avoid these ads, REGISTER NOW!
OP
R

Ryan

Administrator
Staff member
Joined
Jan 26, 2006
Messages
5,688
Location
Texas/Hawaii
Back at the lab and searching very old emails...

So the S/MC has been in my head for a very long time. The battery location portion of this project actually started in early 2023 with a collaboration that I 100% forgot about. Enter Justin Blevins. He had the original STLs for the M18 bases. You can see his shop here:


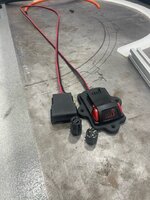
So basically, I took his STLs and modified them to my needs. I then got to the M18 base that matches up to the inverter and hit a roadblock of sorts. It was Justin's idea to start with one of these:


He then tossed the bottom of the case and it's guts and designed a mount that matched my own - allowing me to mount the "male" part of the M18 equation to my bench.

image2.jpeg

All this thing is doing is essentially acting like an extension cord - taking power and ground from the battery mounted on the side of the bench and transferring it to the inverter which is mounted on the face. Nothing at all complicated from an electrical standpoint, but fantastic modeling work by Jason that is, unfortunately, almost completely hidden once the bench is assembled.

About a year after I got this model from Justin, I got the extruded aluminum from Parco. I worked on it for few days and got it as far as installing drawer boxes and then lost steam. The bench sat under another bench of mine for another year until I finished it earlier this week.

I've had so many different projects going on in that time, that the details of this one got foggy... and I feel like **** for not giving Justin his dues. Gotta go edit the feature...
 

Odessaboots

Member
Joined
May 31, 2020
Messages
11
Location
Arroyo Grande, CA
Back at the lab and searching very old emails...

So the S/MC has been in my head for a very long time. The battery location portion of this project actually started in early 2023 with a collaboration that I 100% forgot about. Enter Justin Blevins. He had the original STLs for the M18 bases. You can see his shop here:


So basically, I took his STLs and modified them to my needs. I then got to the M18 base that matches up to the inverter and hit a roadblock of sorts. It was Justin's idea to start with one of these:


He then tossed the bottom of the case and it's guts and designed a mount that matched my own - allowing me to mount the "male" part of the M18 equation to my bench.

image2.jpeg

All this thing is doing is essentially acting like an extension cord - taking power and ground from the battery mounted on the side of the bench and transferring it to the inverter which is mounted on the face. Nothing at all complicated from an electrical standpoint, but fantastic modeling work by Jason that is, unfortunately, almost completely hidden once the bench is assembled.

About a year after I got this model from Justin, I got the extruded aluminum from Parco. I worked on it for few days and got it as far as installing drawer boxes and then lost steam. The bench sat under another bench of mine for another year until I finished it earlier this week.

I've had so many different projects going on in that time, that the details of this one got foggy... and I feel like **** for not giving Justin his dues. Gotta go edit the feature...
Huge thanks for sharing this, super helpful!

Gonna pick up one of those packs on Amazon and give it a go. If my soldering doesn't look too crappy, I might post on here for others to see how it all get's rigged up.
 
OP
R

Ryan

Administrator
Staff member
Joined
Jan 26, 2006
Messages
5,688
Location
Texas/Hawaii
Huge thanks for sharing this, super helpful!

Gonna pick up one of those packs on Amazon and give it a go. If my soldering doesn't look too crappy, I might post on here for others to see how it all get's rigged up.

It's a super easy soldering job. Just two spades... and they are large... I'll see if I have video of that.
 

Stuart in MN

Well-known member
Joined
Sep 8, 2005
Messages
22,901
Location
Minneapolis
I like it a lot. I agree on the casters from medical equipment - I've spent a fair amount of time in doctor's offices and hospitals in recent years, and noticed them on carts, gurneys and so forth They run very smooth and are designed to hold a lot of weight. In fact, many medical facilities use a roll around cart that could be repurposed in its entirety; they have multiple drawers, a rubber bumper around the perimeter that would be good for avoiding bumps into your car, and are extremely rugged. Some of them have provisions for mounting a computer, monitor and keyboard. I suppose you could check around for places that sell used office equipment or medical equipment, they may have some of them for sale. Medical offices also have really nice stools with an adjustable height padded seat, I'd like to have one of those for garage work. They typically have five legs so they're very stable and don't wobble.

An upgrade to the design may be to get your hands on a Luxo magnifier light - they have a circular bulb around the magnifier that puts out a nice amount of light (they used to be fluorescents, I imagine they've switched to LED by now.) I have a couple of them, and the magnifier is real handy if you're working on things like carburetors that are full of small parts. (they do run on 120vac so they'd have to be plugged into the bench inverter.) They are still available new but are expensive - I managed to find mine for reasonable prices at yard sales.

I could see where changing the height may be beneficial to some people, depending on how tall they are. Working bent over a work surface that's too low can be a literal pain in the neck.
 
OP
R

Ryan

Administrator
Staff member
Joined
Jan 26, 2006
Messages
5,688
Location
Texas/Hawaii
I like it a lot. I agree on the casters from medical equipment - I've spent a fair amount of time in doctor's offices and hospitals in recent years, and noticed them on carts, gurneys and so forth They run very smooth and are designed to hold a lot of weight. In fact, many medical facilities use a roll around cart that could be repurposed in its entirety; they have multiple drawers, a rubber bumper around the perimeter that would be good for avoiding bumps into your car, and are extremely rugged. Some of them have provisions for mounting a computer, monitor and keyboard. I suppose you could check around for places that sell used office equipment or medical equipment, they may have some of them for sale. Medical offices also have really nice stools with an adjustable height padded seat, I'd like to have one of those for garage work. They typically have five legs so they're very stable and don't wobble.

An upgrade to the design may be to get your hands on a Luxo magnifier light - they have a circular bulb around the magnifier that puts out a nice amount of light (they used to be fluorescents, I imagine they've switched to LED by now.) I have a couple of them, and the magnifier is real handy if you're working on things like carburetors that are full of small parts. (they do run on 120vac so they'd have to be plugged into the bench inverter.) They are still available new but are expensive - I managed to find mine for reasonable prices at yard sales.

I could see where changing the height may be beneficial to some people, depending on how tall they are. Working bent over a work surface that's too low can be a literal pain in the neck.

I grew up in hospitals, and a lot of the inspiration for this mobile bench came straight from the carts I saw rolling around those sterile hallways. The casters are killer—not just because they’re rated to carry the weight of a small planet, but because they’ll roll over damn near anything without flinching.

And yeah, a Luxo light would be fantastic—no argument there. But I ended up going with a video light, mostly because of the 1/4-20 threads. I needed something that could collapse behind the bench thanks to some height constraints, and short of fabricating a custom setup, the mic stand I already had fit the bill perfectly.

That… and the light is blindingly bright. Like, make-your-eyes-sweat bright.
 

knotdust

Well-known member
Joined
Apr 22, 2019
Messages
2,226
Location
Ohio
I can see where I would be lost down a rabbit hole in a hurry if I had that kind of funds. Fascinating
I know they had a big laser cutout machine at a previous employer. They would put in a big sheet of steel and select the program and hit start. When it was done they would shake or tap the pieces with a dead blow mallet and they would fall out. Fascinating to watch it work punching out weldment parts for the machinery we built. A lot more accurate than a punch style press and less distortion/dross than a gas cutting machine.
 

ThomasN

New member
Joined
Feb 17, 2008
Messages
1
Location
Birmingham, AL
I’d love to get with Parco and duplicate the order- I already own the same Versa vise! This is a fantastic project- well done. 👍🏼
 
To avoid these ads, REGISTER NOW!