To avoid these ads, REGISTER NOW!

Between 485 & 705 SQ/FT Welcome......To Odd Acres

Workspaces between 485 and 705 squarefeet.

jbmatth

Well-known member
Joined
Jun 3, 2013
Messages
5,677
Location
Northern Ok.
This is going to be one very nice vase once you are done, I'm looking forward to the outcome. Also good score on the jackshaft opener, that will be on my list for my next shop space, they just can't be beat.

JB
 
To avoid these ads, REGISTER NOW!
OP
F

Finallygotit

ALLIANCE MEMBER
Joined
Jul 6, 2013
Messages
4,070
Location
Tucson, AZ
Also good score on the jackshaft opener, that will be on my list for my next shop space, they just can't be beat.
Agreed JB! They're more expensive than the standard openers but a standard opener would have required me to move some lighting, run more electrical, crawl around in the attic to run wires....... NOPE! Moving the lights was the major downside. I am so happy with the lighting in the shop that I don't want to touch it. If anything, I want to add more! :willy_nil

:beer:
 
OP
F

Finallygotit

ALLIANCE MEMBER
Joined
Jul 6, 2013
Messages
4,070
Location
Tucson, AZ
Howdy!

I need some inspiration from the collective here on an issue I have.

Last year I installed a shade sail on the west side of our house. Originally, I used the hardware that came with the shade sail except for the screws. I chose to use longer screws that attach to the house so that I could reach any plywood or studs that would be behind the stucco.

I have one corner that is proving to be a PIA. This is now the third time the anchor has pulled out of the wall.
53798549786_95465da297_b.jpg

I made up a laminated block of wood from some plywood, bolted them together and lag bolted the assembly to the wall. This was done to provide a good base for the anchor and to bring it back flush with the stucco. (BTW, i removed the stucco and the styrofoam from the wall so that I could get a good solid place to bolt the assembly.)

53798967120_553c18aaa5_b.jpg

53798549771_ae72794229_b.jpg

Unless someone has an idea of a better solution, my next plan of attack would be to install four 1/4" toggle bolts where the lag bolts went through to try and hold this anchor point once and for all.

Thanks!

:beer:
 

Bob Heine

ALLIANCE MEMBER
Joined
Oct 24, 2009
Messages
10,702
Location
Boca Raton, Florida
Dan, that's horrible. That section of plywood is toast. First thought is a larger piece of plywood set into the Styrofoam and attached with molly or toggle bolts and stucco over the plywood. Second thought is to locate the studs on either side of that location and lag bolt a piece of flat or angle iron with an eyebolt threaded (and welded) to the iron. Maybe some kind of escutcheon to hide the work:
 

bored350

Well-known member
Joined
Mar 17, 2011
Messages
220
Location
Arkansas
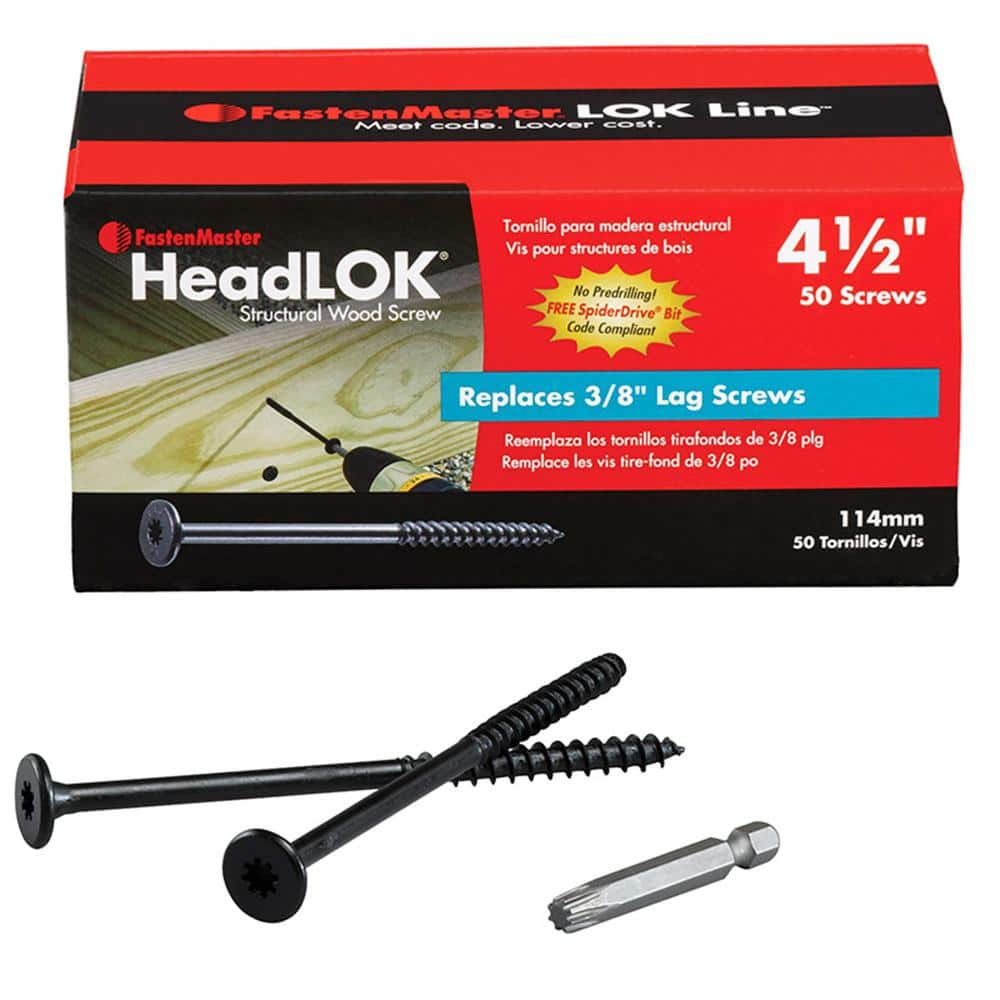
I'm going to piggy back on the increased length, however, add 2 points of input. First, I feel you need a larger spreading of the load. Second, this should be accomplished using a structural screw like this:

You can get these in very long lengths to the extent that it isn't necessary to remove the stucco to get proper penetration. Lag bolts are incorrect for this application IMO and experience.
 

jbmatth

Well-known member
Joined
Jun 3, 2013
Messages
5,677
Location
Northern Ok.
Well my "Overkill is Underrated" signature comes to mind. If what you had worked for a while, make the next revision twice as strong as you think will work, then add a second one as well.

Alternatively, sink a 6" Sch. 80 pipe 4' down in 24" of concrete (rebar reinforcement welded to the pipe, obviously) pipe cap on the top then through bolt an eye bolt then weld it on, oh don't forget to sandblast it completely and have it powder coated before setting it in the concrete. :)

Just a thought,
JB
 

RickP

Well-known member
Joined
Jan 15, 2013
Messages
1,541
Location
Annapolis, MD
+1 on the structural screws -- I've had good luck with those.
Could you relocate the bracket to align it with a stud?

Instead of patching the stucco, I'd cover it (and the area under the new bracket location) with a wide flat piece of PVC trim. My house has siding, and I use pieces of PVC as a flat area to attach things vertically to the wall. You might be able to make yours wide enough to span two studs and embed a piece of angle iron in the back of the PVC if you need additional strength. Wind loads from gusts can be huge, especially in tension on screw threads. Is there any way you could make it a shear load?
 
OP
F

Finallygotit

ALLIANCE MEMBER
Joined
Jul 6, 2013
Messages
4,070
Location
Tucson, AZ
Dan, that's horrible. That section of plywood is toast. First thought is a larger piece of plywood set into the Styrofoam and attached with molly or toggle bolts and stucco over the plywood. Second thought is to locate the studs on either side of that location and lag bolt a piece of flat or angle iron with an eyebolt threaded (and welded) to the iron. Maybe some kind of escutcheon to hide the work:
Bob, thanks for the suggestions. That OSB is definitely toast.

We had some weird winds yesterday which caused this. But of course it was a weird weather issue that caused this. We only had 20-22 mph gusts but the wind was coming out of the south/southwest; which is unusual. When it blew against the house it created a pretty good wind tunnel effect.

I think you need lag bolts about 3 X the length of what you had.
Dennis, I think you nailed it (no pun intended). I made a stupid assumption (sometimes I wonder about my ******* self) that I only had the 1/2" OSB to anchor to.

I just went out there with a length of small rod to see how deep those holes were. They weren't that deep and I hit more wood. That side of the house is in the sun now and with our temps being about 105-109° F, I'm going to wait until tomorrow morning with a long small diameter drill to see how much wood there is; not drilling into the current holes.

That anchor is located at the corner of the house which "should have a few 2x6's sistered there. Believe it or not, when we bought this house, the previous owner asked me if I wanted this, handing me the rolled up plans for this house. Of course I said hell yeah! Now I have to locate them and review. I hope the carpenters built to plan and didn't improvise.

I'm going to piggy back on the increased length, however, add 2 points of input. First, I feel you need a larger spreading of the load. Second, this should be accomplished using a structural screw like this:

You can get these in very long lengths to the extent that it isn't necessary to remove the stucco to get proper penetration. Lag bolts are incorrect for this application IMO and experience.
Thank you! I'm going to check out those structural screws. And like I said previously, I removed the stucco and the styrofoam beneath it so I could get a good solid surface. It looks like I fu-barred on the length of the screws.

Just for my education, what would be a good application for lag bolts?

Yep, and when they poke out of the wall inside ,
bend ‘em up and use them as coat hooks.
You’ll be good. 👍
Steve.................BAHAHAHAHAHAHAHAHAHA. :lol:

Well my "Overkill is Underrated" signature comes to mind. If what you had worked for a while, make the next revision twice as strong as you think will work, then add a second one as well.

Alternatively, sink a 6" Sch. 80 pipe 4' down in 24" of concrete (rebar reinforcement welded to the pipe, obviously) pipe cap on the top then through bolt an eye bolt then weld it on, oh don't forget to sandblast it completely and have it powder coated before setting it in the concrete. :)

Just a thought,
JB
JB, after seeing our shade sail flapping in the wind not as it was supposed to, I had this thought. I thought I would go buy a 3" x 3" square pipe about 20' long. I would sink about 8' into the ground into a 2 foot diameter sonotube filled with concrete. At the top of the tube I would attach a 2" braided steel cable and run it to the other corner of the house to another piece of said 3" x 3" tube anchored in the ground. And which point I would stand back and look at the shade sail anchor and say, "PHA-Q!"

All of that is to say that we're on the same page. :thumbup:

+1 on the structural screws -- I've had good luck with those.
Could you relocate the bracket to align it with a stud?

Instead of patching the stucco, I'd cover it (and the area under the new bracket location) with a wide flat piece of PVC trim. My house has siding, and I use pieces of PVC as a flat area to attach things vertically to the wall. You might be able to make yours wide enough to span two studs and embed a piece of angle iron in the back of the PVC if you need additional strength. Wind loads from gusts can be huge, especially in tension on screw threads. Is there any way you could make it a shear load?
Rick, like I said earlier, I need to do some more investigation but those structural screws look like the ticket.

I'm liking the idea of an escutcheon rather than re-stucco. I have some aluminum plate cut-offs that I could use.

Also, the way the shade sail is anchored, the load is partially in both shear and tension. And unfortunately I don't think I have a way to make the anchor plane completely in shear.

Guys, I thank you all very much for the input. It really helps to bounce ideas and experience around.

:beer:
 

Bob Heine

ALLIANCE MEMBER
Joined
Oct 24, 2009
Messages
10,702
Location
Boca Raton, Florida
53800938625_79debf1e80_b.jpg
Nice Shovelope. Or is that a Spadosaurus.

I also really like your hose reel!
 
OP
F

Finallygotit

ALLIANCE MEMBER
Joined
Jul 6, 2013
Messages
4,070
Location
Tucson, AZ
Nice Shovelope. Or is that a Spadosaurus.

I also really like your hose reel!
Bob, I really had to laugh because at first I was thinking, what the hell is he talking about! You should see the collection of metal art my lovely wife has acquired. And she has names for them all!!!!

We like those hose reels so much, we have five of them.

:beer:
 
OP
F

Finallygotit

ALLIANCE MEMBER
Joined
Jul 6, 2013
Messages
4,070
Location
Tucson, AZ
From that picture there should be some framing under that location to anchor into. I'll also 2nd or 4th the fastenmaster structural screws suggestion.
Jar, according to the house plans, there is a lot of lumber in that area. I'm going to go out in a bit to drill.

I'm going to go and purchase some of those screws today.

:beer:
 

-Brent-

Well-known member
Joined
Dec 23, 2009
Messages
4,709
Location
Utah
I like the 3x3 tubing post idea. There's no need to go 8' deep, though.

We repaired some shades like you have. One corner was mounted to a pergola and even 2.5" lags didn't hold the way they were mounted (where they'd pull straight out). It wasn't until we fabricated a corner bracket that was bolted so the bracket utilized the shear strength of the bolts.

In your case, that 3x3 post (thick wall) with an eye or ring welded to it would put at 24-36" (if it's 8' tall) would last.

It's not much different than a sail. There's incredible force at the mount points.
 
OP
F

Finallygotit

ALLIANCE MEMBER
Joined
Jul 6, 2013
Messages
4,070
Location
Tucson, AZ
OK, on the suggestion of @bored350, I purchased these......
53804918433_a7e0950c1c_b.jpg

The anchor is now one with the wall.
53805107435_c16de36e5c_b.jpg

As I drove those screws in, they were biting on lumber the whole way. For good measure, I clipped on one of my ratchet straps and hung some dead weight on it (me) and it did not budge.

So I caulked in the empty space around the contraption and started to make an aluminum escutcheon plate. Looks like the monsoon rains are getting ready to kick off here soon so I need to get this completed to avoid getting water in there.

Again, thank you all for your help.

:beer:
 
To avoid these ads, REGISTER NOW!
OP
F

Finallygotit

ALLIANCE MEMBER
Joined
Jul 6, 2013
Messages
4,070
Location
Tucson, AZ
Great job on the permanent repair of the anchor Dan. I know those types of tasks can be frustrating, but you did a fantastic job on the repair and can now rest assured that it will hold.
Thanks Mike! After I looked at the lag screws that I installed previously, it was obvious that the length just wasn't there for the task at hand. Oh well, another learning lesson.

:beer:
 
OP
F

Finallygotit

ALLIANCE MEMBER
Joined
Jul 6, 2013
Messages
4,070
Location
Tucson, AZ
So to make those brass inserts, I had to measure each opening in the vase as they were all different; close but no cigar. I also had to do some filing on each opening to get them somewhat square and to clean out any glue that squeezed out on assembly.

Then it was to the mill to machine each piece.
53818043879_3bfcb827f1_b.jpg

Once each piece was to height and width, I would cut it off and final fit it to the opening. At that point I would scribe a line to match the contour of the vase.
53817713031_ba15c87392_b.jpg

I made this holder to keep the inserts cut side perpendicular to the outside and to physically be able to hold onto the insert.
53818043964_10caa82a07_b.jpg

Then I would use either the drum sander or the belt sander and machine to the scribed line.
53818148735_5511f7e79e_b.jpg

Once I had the shape on the front, I would take the insert to the deburring wheel to get rid of the sanding lines.
53817955333_3e974d51c0_b.jpg

53818043754_33449dcc2a_b.jpg

After the deburring wheel, I clamped the holder in the vise and polished the face with my Dremel that had a felt bob on it using Simichrome polish to bring it to a mirror finish. I then took the insert out and sprayed it with a semi-gloss clear paint so that it would not tarnish. And after all that, I glued the piece in place. Rinse and repeat.

Next up, finish the base.

:beer:
 
Last edited:
OP
F

Finallygotit

ALLIANCE MEMBER
Joined
Jul 6, 2013
Messages
4,070
Location
Tucson, AZ
So I finally finished the wood vase project (pictures coming shortly). But this was one of those projects that required a few projects to be done so I could finish the real project. :eyecrazy:

To finish the base for the vase I needed to use the mill turntable. At 140 pounds, my days of doing the clean and jerk with cumbersome cast iron are behind me. My plan was to use the engine hoist to pull those duties but the legs on it were too long to maneuver in the shop and get it close enough to the mill. So I dragged myself over to Industrial Metals and picked up some square tubing about half the length of the existing legs. I had to machine off about 0.060" from each side to get them to telescope into the frame.

53888394782_79126223ae_b.jpg

Once that was done I needed to machine a couple of blocks to attach the wheels to.

53888394997_3832382e16_b.jpg

Once done, this worked out extremely well to pick up the turntable and cart it around.

53889729880_55d833d206_b.jpg

53889729945_8d36e23cdf_b.jpg

Of course the turntable needed some cleaning from decades of accumulated filth but I didn't want to get too carried away yet as I just needed it to work. I will refurbish this later. I also needed (wanted) to make some locating blocks for it so that when I placed it on the mill, the turntable would be absolutely squared up with the table.

53889645039_33e23e4e12_b.jpg

As it turned out, making those new legs for the engine hoist came in handy as our water heater started going south. So I dragged the hoist up to the garage. Picking up the old heater and lifting the new one in place was an easy one man job.

53888395562_08d4fa543c_b.jpg

Since this picture was taken, I straightened out the copper drain pipe for the relief valve.

Back to the shop, I started making chips on the aluminum base for the vase. First to the lathe to get this.

53889730960_02dbc849b9_b.jpg

Then onto the turntable.

53889543003_2e2c8f96c0_b.jpg

Having that turntable was really nice. I could also tip it up 90° so that I could machine a nice big radius on the OD of the piece.

And here it is completed.

53889730765_5ab28a431b_b.jpg

53889305701_945658d5d6_b.jpg

I painted the base with Rustoleum brass paint. Come to find out, it doesn't stick to well to bare aluminum. Taking a piece of tape to it showed me it pealed right off. So I stripped it back down and sprayed it with an etching primer and then recoated. All good now!

In between those projects, my lovely wife has been looking for a Kleenex box cover for said tissues. She could not find anything she liked. One day she mentioned that she would like to find something close to the same color as our countertops. Then I mentioned that we had some leftover pieces from the install. So I made a new box!

53889305506_42ce245f35_b.jpg

53889645644_2784b0ae1d_b.jpg


More fun to come!

:beer:
 
Last edited:
OP
F

Finallygotit

ALLIANCE MEMBER
Joined
Jul 6, 2013
Messages
4,070
Location
Tucson, AZ
Awesome job on all Dan. :bowdown: :bowdown:
Thanks Mike!

Thank you!!

You know......that fancy lift table that Mike Z just bought, would really come on handy if you purchased one too! Nice work on that beautiful vase and base though!
Yeah, that lift table of Mike's is sweet. Buuuuut.....since I already had the engine hoist......

And thank you!

Wow, the vase is really neat! The brass inserts are unique, I like it. Genius move on the Kleenex box cover 🤣

🍻
Thanks Nick!

Those are some nice projects you've been knocking out! Was the kleenex cover a single piece or did you have to assemble the pieces?
I made and assembled the Kleenex box cover from leftover 1/2" back splash. I told my wife that I had to run to ACE to get a different glue to assemble this. I got this "look" then she said, "You don't have enough glue??" It's a running joke around here that I have lots and lots of glue and lots and lots of screws/nuts/bolts. So when I say I have to make an ACE run, I get "the look". :dunno:

:beer:
 
OP
F

Finallygotit

ALLIANCE MEMBER
Joined
Jul 6, 2013
Messages
4,070
Location
Tucson, AZ
Had some fun this past week. :headshake

It came time for me to clean the mini-split in the shop. I was trying to wait until it cooled off a bit more but it was throwing small clumps of dust, dripping water inside and not performing as it should.

I reviewed a bunch of videos on YouTube that were supposed to be of Carrier specific units that were "close" but left a bunch out. So I dove into it. It wasn't really that bad to disassemble the housing and other parts but it was time consuming at three and a half hours. I'm sure the time will be a lot less in future cleanings knowing what I know now. I'm embarrassed to say this but this is the first time I have cleaned the inside unit since I bought it......about 7-1/2 years.

I started by draping some plastic on the wall after I got the housing off.

54009242945_77af497f26_b.jpg

This job gets to be a bit wet so covering the wall is a must. There are some companies on the interwebs that sell a kit to do this maintenance which include the draping, cleaner, collection bucket, etc.

Here's the cleaner I bought for the job that worked really well.

54013793895_fa501d5afd_b.jpg

I have more than enough left over to do another round of maintenance.

One of the issues I had prior to this maintenance was with the dripping of water where water should not have been. Part of that problem was the clogged evaporator fins and part was that the whole unit was not quite level from when the HVAC guy installed it. The hanger on the wall was installed correct and level but the unit was not installed correct on the hanger. I have since corrected that.

This is the drip pan that collects the condensate. YUCK!

54009145214_722d5d2b18_b.jpg

In this picture, I partially cleaned the muck out of there but then took it down to give it a really good cleaning.

After spraying the cleaner, brushing the fins and coils with a soft paint brush and spraying the assembly with water, what came dripping out of there looked like used engine oil. I then gave it another round of cleaning and then blew the assembly and squirrel cage fan with compressed air.

I also pulled the cover on the outside condenser and vacuumed out the two mummified mice and their treasures, rinsed off the fins and coils and put new foam insulation on the cooling lines.

51773732487_e9811886bf_b.jpg

I reassembled everything and powered it up. This thing works like new again. I will definitely be cleaning this a bit more often than 7-1/2 years.

:beer:
 
To avoid these ads, REGISTER NOW!
Top Bottom