To avoid these ads, REGISTER NOW!

Between 265 & 485 SQ/FT Woody's Works Garage

Workspaces sized between 265 and 485 squarefeet.
To avoid these ads, REGISTER NOW!
OP
D

Denwood

Well-known member
Joined
Sep 22, 2014
Messages
4,172
Location
Thunder Bay, Ontario, Canada
Here’s a PSA if you are looking for “permanent” LED lighting for your house or garage. I bought the Govee Pro lights on a Black Friday deal. You can cut and splice, remove lights, etc anywhere with these “pro” lights, but there a few gotchas, particularly if you want to branch off or “Y” to a different roof section. Essentially you cannot, as each light is addressable by the controller and communication is one way only. The only way to branch off would be to use extension cables at both ends of a “split” which may mean running an extra 60 feet of wire…

Now, ASAHOM S108C is a similar LED product but with a far more versatile controller, much longer total string capacity, with dual outputs, brighter LEDs, power injection, and a comprehensive installation package that should almost eliminate any need for cuts/splices, and yes..the ability to T split. Not sure how they figured that out, but lo and behold, their T device ($22) also works with Govee Pro lights as long as you configure it with the Asahom app on first use. Oh, and they are about $100 cheaper, particularly the amazon.ca version in white...it's $100 cheaper in white vs black.

If you’re shopping for exterior LEDs, you’ll want to take a good look at the ASAHOM lights. Would have 100% gone that way knowing what I know now. I have gone down the LED rabbit hole a bit so am building out some very inexpensive controllers using ESP32 project boards ($10 each for the boards!) running the workhorse of LED management these days, WLED. Any LED projects going forward will use this setup, including a redo of our fireplace/library room to begin next week.

The Asahom T-Splitter is the little box on the left with 3 leads. It's connected to Govee Pro lights..and it works. You do need to install the Asahom app, connect to the T splitter box via bluetooth, and set it up for Govee Pro Lights...then you can remove the app if you like. The pic below is just a quick test. The T-splitter is now installed at the garage corner behind the shed, so I could T off to the shed. With these Govee Pro lights you can cut anywhere, splice anywhere, and add a few lights if you need to. The Govee app walks you through a basic setup so it knows how many segments (10 lights per segment) you have, and how many you have cut off, if applicable. From then on, the controller can address each LED light to do anything from mood lighting to crazy RGB effects synced to music.


IMG_3292.jpeg

Lights are set up today with a basic Christmas C9 pallete with purple added in as per the Missus' request. For @nicholam77 and assorted automation guys, the Govee integration to the house's Hubitat hub allows me to manage just about anything including loading complex effects, control specific segments, dim, turn them on/off etc. There is an option both in the Govee app and Hubitat integration (which I am using) to manage everything from my local LAN, so I'm only using the Govee app to experiment with effects. This way if the internet is down or Govee servers down, everything still works. After the Hub turns the lights off for the night, they are controlled by a few HUE outdoor motion sensors which will light up the house and garage for a few minutes if any motion is detected. On a new build, I'd seriously consider eliminating convential outdoor lights and just controlling LEDs like this. I'm using a small single IKEA wireless switch inside which the family can use to override the automation for the outside stair, christmas yard decorations, Govee lights and interior christmas lighting. The automation hub manages on/off based on the daily sunset/sunrise times, but the little IKEA switch will turn them all off or on anytime the family wants manual control.

IMG_3300.jpeg

The integrated stair and railing lighting has worked great for the last 10 years using a basic 12Volt transformer and G4 LED bulbs. I'm going to upgrade these soon to RBG lights to integrate with the house lighting.
 
Last edited:
OP
D

Denwood

Well-known member
Joined
Sep 22, 2014
Messages
4,172
Location
Thunder Bay, Ontario, Canada
Alice jumps down the rabbit hole...

This is what it looks like with a DIY setup to control the Govee Pro Lights. They don't sell bare controllers, so if you have a few strings left over and you want to use them, this will get you going. There are 4 bits to the puzzle for about $50.

1. 36 volt 4 amp (DC) power supply
2. ESP32 controller (so you can have all the fancy colors and effects)
3. WLED software (free) installed on the above ESP32 with a USB cable/PC and a web browser pointed to https://install.wled.me/
4. Power buck to take the 36 Volts from the power supply to 5V for the ESP32.

The ESP32 has an on/off button in case you want to do things old school :)

Wired up for quick test:

IMG_3301.jpeg


Power buck on left, ESP32 on the right. The 36 Volt power/ground are connected directly to the LEDs string, and the power buck input. The power buck outputs 5 volts for the ESP32, and signal wire (yellow) from the ESP32 goes to the LED lights. The ESP32 is plugged into a breakout board to make connections easier, but the board itself is pretty tiny.

IMG_3302.jpeg


WLED app connects to ESP32 via WIFI. You can build an entire lighting system with advanced effects using these $10 boards and the WLED software to sycn them all.

IMG_3303.png


This setup is all you need to create magic with LED strips like these which can be cut/soldered/spliced etc. for built in lighting etc. I've got a few of these inbound to do a fireplace/libray room with integrated lighting.

1765562359313.png
 

Dan in Pasadena

Well-known member
Joined
Feb 18, 2009
Messages
13,076
Location
Pasadena, CA
Here’s a PSA if you are looking for “permanent” LED lighting for your house or garage. I bought the Govee Pro lights on a Black Friday deal. You can cut and splice, remove lights, etc anywhere with these “pro” lights, but there a few gotchas, particularly if you want to branch off or “Y” to a different roof section. Essentially you cannot, as each light is addressable by the controller and communication is one way only. The only way to branch off would be to use extension cables at both ends of a “split” which may mean running an extra 60 feet of wire…

Now, ASAHOM S108C is a similar LED product but with a far more versatile controller, much longer total string capacity, with dual outputs, brighter LEDs, power injection, and a comprehensive installation package that should almost eliminate any need for cuts/splices, and yes..the ability to T split. Not sure how they figured that out, but lo and behold, their T device ($22) also works with Govee Pro lights as long as you configure it with the Asahom app on first use. Oh, and they are about $100 cheaper, particularly the amazon.ca version in white...it's $100 cheaper in white vs black.

If you’re shopping for exterior LEDs, you’ll want to take a good look at the ASAHOM lights. Would have 100% gone that way knowing what I know now. I have gone down the LED rabbit hole a bit so am building out some very inexpensive controllers using ESP32 project boards ($10 each for the boards!) running the workhorse of LED management these days, WLED. Any LED projects going forward will use this setup, including a redo of our fireplace/library room to begin next week.

The Asahom T-Splitter is the little box on the left with 3 leads. It's connected to Govee Pro lights..and it works. You do need to install the Asahom app, connect to the T splitter box via bluetooth, and set it up for Govee Pro Lights...then you can remove the app if you like. The pic below is just a quick test. The T-splitter is now installed at the garage corner behind the shed, so I could T off to the shed. With these Govee Pro lights you can cut anywhere, splice anywhere, and add a few lights if you need to. The Govee app walks you through a basic setup so it knows how many segments (10 lights per segment) you have, and how many you have cut off, if applicable. From then on, the controller can address each LED light to do anything from mood lighting to crazy RGB effects synced to music.

Lights are set up today with a basic Christmas C9 pallete with purple added in as per the Missus' request. For @nicholam77 and assorted automation guys, the Govee integration to the house's Hubitat hub allows me to manage just about anything including loading complex effects, control specific segments, dim, turn them on/off etc. There is an option both in the Govee app and Hubitat integration (which I am using) to manage everything from my local LAN, so I'm only using the Govee app to experiment with effects. This way if the internet is down or Govee servers down, everything still works. After the Hub turns the lights off for the night, they are controlled by a few HUE outdoor motion sensors which will light up the house and garage for a few minutes if any motion is detected. On a new build, I'd seriously consider eliminating convential outdoor lights and just controlling LEDs like this. I'm using a small single IKEA wireless switch inside which the family can use to override the automation for the outside stair, christmas yard decorations, Govee lights and interior christmas lighting. The automation hub manages on/off based on the daily sunset/sunrise times, but the little IKEA switch will turn them all off or on anytime the family wants manual control.

The integrated stair and railing lighting has worked great for the last 10 years using a basic 12Volt transformer and G4 LED bulbs. I'm going to upgrade these soon to RBG lights to integrate with the house lighting.
I'd like to say I understand you but really? FM - F*ckin' Magic to me. I admit to not even reading it all; it's just confusion.
I think I COULD undetstand if I truly applied myself to reading this carefully but I've gotten to that age where if it's not plug 'n play I don't want to deal with it.
 
OP
D

Denwood

Well-known member
Joined
Sep 22, 2014
Messages
4,172
Location
Thunder Bay, Ontario, Canada
I'd like to say I understand you but really? FM - F*ckin' Magic to me. I admit to not even reading it all; it's just confusion.
I think I COULD undetstand if I truly applied myself to reading this carefully but I've gotten to that age where if it's not plug 'n play I don't want to deal with it.

I get what you're saying 100%. My general approach to all this stuff is pretty much the same, then the rabbit hole appears and I jump down for a bit, then on to the next project..ha. Once the discovery\learning curve flattens out I tend to get a bit bored...
 

drivesitfar

Well-known member
Joined
Oct 23, 2013
Messages
35,965
Location
Pacific Northwest
Woody: as you probably know I’m not nearly as techie as you but I always love your detailed posts so you can help those that are. Nice work as per usual.

Just an fyi and you may already know this. My bride won’t let me install any interior LED lights cause of health reasons. Google downside on LED lighting if you aren’t sure what I’m talking about.

In fact when all the old style light bulbs were going off the shelves I think I bought out last supply from several Home Depot stores that I still have a few.

Hope you’re staying warm and have a merry Christmas.
 
OP
D

Denwood

Well-known member
Joined
Sep 22, 2014
Messages
4,172
Location
Thunder Bay, Ontario, Canada
Thanks as always @drivesitfar for checking in on the thread! I did do the Google search as you suggested…some good points there. I will say that the inside LEDs we use are primarily Philips Hue. They are expensive, but very reliable for automation. So far, no ill effects for the family :)

You make a good point though as the gold standard for CRI etc is still the good old incandescent bulb with a tungsten filament.
 

Bob Heine

ALLIANCE MEMBER
Joined
Oct 24, 2009
Messages
10,702
Location
Boca Raton, Florida
Drives and Dennis, I have replaced all the lights in the house with LEDs. Inside the living area, all but the floodlights in the kitchen are warm hue (2700K) and all the lights in the bedrooms are 3-way bulbs that are set to the dimmest setting. Only time they go on high is to read instructions for the $%^# smartass TV. The low voltage outdoor, fluorescent garage and workshop replacement bulbs are daylight white (5000K). I haven't experienced any ill effects but I'm very aware of how many cars have dazzling blue-white headlights so I limit my nighttime driving as close as possible to Never. I am more concerned with how much mercury (from discarded fluorescent bulbs) has been dumped in the land fills that sit on the porous ground that sits on top of the Florida water supply. Then I remember I'm 81, not 18 and I'm certain most of my excess weight is due to the amount of lead I've consumed.
 
OP
D

Denwood

Well-known member
Joined
Sep 22, 2014
Messages
4,172
Location
Thunder Bay, Ontario, Canada
.... Then I remember I'm 81, not 18 and I'm certain most of my excess weight is due to the amount of lead I've consumed.
If that is the case, then my cremation orders just changed in favour of tranformation to something useful...like a boat anchor :) The city did inform of us of a length of lead pipe out front...
 
OP
D

Denwood

Well-known member
Joined
Sep 22, 2014
Messages
4,172
Location
Thunder Bay, Ontario, Canada
Merry Christmas and all that fun stuff gents :)

Shot a bit of video while banished from the house (daughter's dance crew christmas party). It's basically a summary of all I've learned regarding LED lighting over the last month, including some essential DIY tips, and information for anyone looking to DIY their own advanced LED lighting for house projects etc. My graphics skills are rudimentary at best, so I gave ChatGPT (AI) a go with respect to designing the thumbnail. Interested to hear your opinions in it. Chat had some really good tips on the title itself and did a decent job I think given the screen grab I uploaded for it to modify with the graphic.

 
Last edited:

PhantomEB

Well-known member
Joined
Feb 6, 2006
Messages
6,648
Location
Medicine Hat, AB, Canuckistan
I did a quick install of Govee lights on one side of the house as well the outdoor patio and down one side of the garage where we have a gravel pad with fire pit.

need to redo the house ones way closer to the house as they all look muted out by the gutters. Momma wants me to turn off the side of the house where I ran them all the way back to put a power box up there and eliminate any extension cords needed.
 
OP
D

Denwood

Well-known member
Joined
Sep 22, 2014
Messages
4,172
Location
Thunder Bay, Ontario, Canada
I did a quick install of Govee lights on one side of the house as well the outdoor patio and down one side of the garage where we have a gravel pad with fire pit.

need to redo the house ones way closer to the house as they all look muted out by the gutters. Momma wants me to turn off the side of the house where I ran them all the way back to put a power box up there and eliminate any extension cords needed.
One of the non-obvious benefits to the Govee lights is that with devices like the HUE outdoor (wireless) motion sensor, you really don't need outside floods anymore. At full brightness they pretty much light up the yard. In new construction, installing outlets in soffits is not a terrible idea...
 
OP
D

Denwood

Well-known member
Joined
Sep 22, 2014
Messages
4,172
Location
Thunder Bay, Ontario, Canada
Some interesting measurements and observations comparing the new Milwaukee sub compact/high torque impacts vs my 15 year old CF pneumatic twin hammer 1/2" impact. The sub compact drivers struck me right away as loud...and they are. Each was over 100db. That's ear damage in 15 minutes or so using the sub compacts vs the high torgue electric and old impact at 90db. 90db is percieved as about half the loudness of 100db.

This is a 2 minute short that covers a lot of ground. I really like the short format...

 
Last edited:
OP
D

Denwood

Well-known member
Joined
Sep 22, 2014
Messages
4,172
Location
Thunder Bay, Ontario, Canada
I was puzzled by the difference between the 1/2" and 3/8" drive Milwaukee stubbies. They should the same, no? There is a big difference that I figure must have something to do with the smaller drive working like a smaller gear, therefore more torque. Any experts on this, I'd be interested to hear your opinions! Test below is with a nut at 100 ft/lbs, and then again at 250 ft/lbs with two different batteries. I wish I had been aware of this before buying them...

This 1 minute short is self explanatory.

 
Last edited:

jon72vega

Well-known member
Joined
Apr 17, 2013
Messages
3,436
Location
Niles Michigan
I was puzzled by the difference between the 1/2" and 3/8" drive Milwaukee stubbies. They should the same, no? There is a big difference that I figure must have something to do with the smaller drive working like a smaller gear, therefore more torque. Any experts on this, I'd be interested to hear your opinions! Test below is with a nut at 100 ft/lbs, and then again at 250 ft/lbs with two different batteries. I wish I had been aware of this before buying them...

This 1 minute short is self explanatory.

Wow, I'd feel cheated if I purchased the 1/2 drive and then saw this video.
 
OP
D

Denwood

Well-known member
Joined
Sep 22, 2014
Messages
4,172
Location
Thunder Bay, Ontario, Canada
Well, finally reached 1000 subscribers on the YT, which was my goal for 2025. Thanks guys and gals! There's no illusion of grandeur, as at best I'll generate enough revenue to buy a few coffees per month..ha. It's been fun learning to shoot solo with half decent audio, do basic color correction, set up adequate lighting and edit. It gave me an excuse to play around with drones a bit too. I just started with the YT shorts which honestly are way less work really as you're restricted to 3 minutes and I think most folks don't expect crazy editing or camera work. The format forces you to focus on useful content, delivered efficiently.

Garagejournal got me started over a decade ago with the goal of trying to contribute back as much as I learn from your forum posts, learning from videos on YT, etc. I looked back in my thread and remembered that this thread by @Xander
https://www.garagejournal.com/forum/threads/my-24-x-32-2-car-garage-build.157864/ was the first time I found garagejournal via a google search. It inspired my own garage project and I've been here ever since!
 
Last edited:
OP
D

Denwood

Well-known member
Joined
Sep 22, 2014
Messages
4,172
Location
Thunder Bay, Ontario, Canada
One of the downsides of living in the rust belt are issues like this with my Dad's 2015 Subaru. He called in a panic with the "I've got no brakes" issue. The good news is that even with a ruptured brake line, you stil have at least two wheels worth of brakes. Replacing a drivers side (rear) steel brake line means potentially removing the fuel tank, exhaust, drive shaft and rear sub-frame. Fortunately we sorted a much simpler repair. Here's the 58 second summary..ha.

2015 Subaru Outback - Drivers side rear brake line repair.

 
Last edited:
OP
D

Denwood

Well-known member
Joined
Sep 22, 2014
Messages
4,172
Location
Thunder Bay, Ontario, Canada
My short comparing old school air impact to battery is approaching 150K views, and 183 comments. I had a LOT of guys suggesting I was using "Auto" mode incorrectly on the Milwaukee impacts. I was not :)

It's a 3 minute short...but just leave them in auto for most work! The other surprise was that the Ridgid 1/2" impact (all of $99) did manage to remove the fastener at 250 ft lbs in about 5 seconds, auto mode. This does seem to work better than manual mode which took almost twice that time.

 
Last edited:
To avoid these ads, REGISTER NOW!

nicholam77

Well-known member
Joined
Dec 18, 2016
Messages
2,652
Location
Minneapolis, MN
Alice jumps down the rabbit hole...

This is what it looks like with a DIY setup to control the Govee Pro Lights. They don't sell bare controllers, so if you have a few strings left over and you want to use them, this will get you going. There are 4 bits to the puzzle for about $50.

1. 36 volt 4 amp (DC) power supply
2. ESP32 controller (so you can have all the fancy colors and effects)
3. WLED software (free) installed on the above ESP32 with a USB cable/PC and a web browser pointed to https://install.wled.me/
4. Power buck to take the 36 Volts from the power supply to 5V for the ESP32.

Nice job with all the LED lighting, Dennis.

I was going to ask if you could use the Govee strips with WLED, but I guess you already have!

I was so close to going WLED + BTF strips for my kitchen under cabinet lighting, but I got a bit overwhelmed with all the types and densities of strips, variations on controller boards, power supplies, calculations, etc. Maybe if you had your video out at that point I would have been more willing to figure it out! In the end a nice Amazon sale on some Hue strips was all it took to convince me to go that route.

Garagejournal got me started over a decade ago with the goal of trying to contribute back as much as I learn from your forum posts, learning from videos on YT, etc. I looked back in my thread and remembered that this thread by @Xander
https://www.garagejournal.com/forum/threads/my-24-x-32-2-car-garage-build.157864/ was the first time I found garagejournal via a google search. It inspired my own garage project and I've been here ever since!

Glad you're still on the site and posting after all these years!

And congrats on the YT milestone. Even if it doesn't currently amount to much financially, it's still a neat accomplishment.

Just an fyi and you may already know this. My bride won’t let me install any interior LED lights cause of health reasons. Google downside on LED lighting if you aren’t sure what I’m talking about.

Hey Drives, hope you don't mind me jumping in. Just a PSA in case you can no longer find incandescent bulbs one day — FYI there are LED manufacturers that make good quality LED bulbs that focus on the human health elements that I can only assume you're referring to.

The main thing I see people refer to with LED's is blue light before bedtime, which messes with your circadian rhythms and melatonin production. But really to me I think it is the following:

Color Temperature (warm vs cool)
Brightness (measured in Lumens, many LED's are way too bright imo)
Spectrum (how full and accurate is the spectrum, there are multiple measures but CRI is common as well as R6)
Flicker
Smooth Dimming
(doesn't interfere with any of the above)

Many LED's do have a blue spike, and are typically strongest in blue and green due to how the diode works. And are typically low in red.

spectrum.png

The first thing you can do is get 2700k temperature bulbs, especially in areas you spend time in the evening. These are a warm white and are closer to warm-white incandescent. It's not that blue light is bad for you... it's just not ideal before bed.

But beyond that, there are several brands that focus on "full spectrum" LED's, especially in the red wavelengths, and also employ anti-flicker tech as well as anti-flicker dimming.

Bedtime Bulb — I have these in all our bedrooms and they are awesome, they are the closet thing I've found to incandescent

Waveform Lighting — I have a few of these as well, and they are good, although not as warm as the Bedtime Bulb

There are a few others with cheaper options (like Sylvania has a Human Centric line called LumiNature), and GE has an Ultra Definition product with 2200k color temp, low brightness, and EyeComfort technology.

I would be comfortable using the first two interchangeably with incandescent. I can't speak as much to the second two since I haven't tried them.

Keep in mind that the main time any artificial light will most affect you is at night when the sun is down (or any other room without natural light).

Personally, I do the following:

1) prioritize natural light during the day (through windows is fine)
2) use 2700k or warmer bulbs in the evening
3) use high quality extra-warm full spectrum bulbs with anti-flicker tech in bedrooms (like the Bedtime Bulb or Waveform bulbs)
4) use low brightness lighting in the evening! This can be dimmed bulbs, or non-dimmed low brightness bulbs (450 lumens or lower), and also remember that the power of light is based on the inverse square law (the closer you are the more power). This often takes the form of table lamps instead of overhead lighting

As you might know from my comments here, I also have a lot of smart bulbs that are... fine, performance-wise. They aren't 'human centric' like the ones I listed above. You could argue they aren't ideal. However... kept on warmer tones and lower brightness in the evening, and then only using the good bulbs in bedrooms (no smart lights), I have no concerns.

At the end of the day, I think it's a valid topic, but not earth-shattering health-wise. Not to say it doesn't bother some people more than others, but unless you're also not watching any TV's, computer screens, or phones after sunset, it's a bit of a moot point. My POV is do what you can, but LED tech has come a long way from the early days and there are actually perfectly viable options out there should you so choose. They do cost more, but they also *should* last a lot longer than incandescents.

Btw this is not to say you should stop using incandescents — I fully agree they are the best. I am just trying to shed some light (pun intended!) in case anyone is interested.

The last thing I'll say if you are concerned about your circadian rhythms, is that the best thing you can do is view the sunrise and sunset. Outdoors. Ideally 20min of sunlight when you wake up (as soon as possible), and then a bit in the evening as it's going down with warmer spectrum. That will help set your body clock (with light) better than anything.

Sorry for hijacking, hope it was mildly interesting
 
Last edited:
OP
D

Denwood

Well-known member
Joined
Sep 22, 2014
Messages
4,172
Location
Thunder Bay, Ontario, Canada
Nice job with all the LED lighting, Dennis.

I was going to ask if you could use the Govee strips with WLED, but I guess you already have!

I was so close to going WLED + BTF strips for my kitchen under cabinet lighting, but I got a bit overwhelmed with all the types and densities of strips, variations on controller boards, power supplies, calculations, etc. Maybe if you had your video out at that point I would have been more willing to figure it out! In the end a nice Amazon sale on some Hue strips was all it took to convince me to go that route.


Glad you're still on the site and posting after all these years!

And congrats on the YT milestone. Even if it doesn't currently amount to much financially, it's still a neat accomplishment.


Hey Drives, hope you don't mind me jumping in. Just a PSA in case you can no longer find incandescent bulbs one day — FYI there are LED manufacturers that make good quality LED bulbs that focus on the human health elements that I can only assume you're referring to.

The main thing I see people refer to with LED's is blue light before bedtime, which messes with your circadian rhythms and melatonin production. But really to me I think it is the following:

Color Temperature (warm vs cool)
Brightness (measured in Lumens, many LED's are way too bright imo)
Spectrum (how full and accurate is the spectrum, there are multiple measures but CRI is common as well as R6)
Flicker
Smooth Dimming
(doesn't interfere with any of the above)

Many LED's do have a blue spike, and are typically strongest in blue and green due to how the diode works. And are typically low in red.

spectrum.png

The first thing you can do is get 2700k temperature bulbs, especially in areas you spend time in the evening. These are a warm white and are closer to warm-white incandescent. It's not that blue light is bad for you... it's just not ideal before bed.

But beyond that, there are several brands that focus on "full spectrum" LED's, especially in the red wavelengths, and also employ anti-flicker tech as well as anti-flicker dimming.

Bedtime Bulb — I have these in all our bedrooms and they are awesome, they are the closet thing I've found to incandescent

Waveform Lighting — I have a few of these as well, and they are good, although not as warm as the Bedtime Bulb

There are a few others with cheaper options (like Sylvania has a Human Centric line called LumiNature), and GE has an Ultra Definition product with 2200k color temp, low brightness, and EyeComfort technology.

I would be comfortable using the first two interchangeably with incandescent. I can't speak as much to the second two since I haven't tried them.

Keep in mind that the main time any artificial light will most affect you is at night when the sun is down (or any other room without natural light).

Personally, I do the following:

1) prioritize natural light during the day (through windows is fine)
2) use 2700k or warmer bulbs in the evening
3) use high quality extra-warm full spectrum bulbs with anti-flicker tech in bedrooms (like the Bedtime Bulb or Waveform bulbs)
4) use low brightness lighting in the evening! This can be dimmed bulbs, or non-dimmed low brightness bulbs (450 lumens or lower), and also remember that the power of light is based on the inverse square law (the closer you are the more power). This often takes the form of table lamps instead of overhead lighting

As you might know from my comments here, I also have a lot of smart bulbs that are... fine, performance-wise. They aren't 'human centric' like the ones I listed above. You could argue they aren't ideal. However... kept on warmer tones and lower brightness in the evening, and then only using the good bulbs in bedrooms (no smart lights), I have no concerns.

At the end of the day, I think it's a valid topic, but not earth-shattering health-wise. Not to say it doesn't bother some people more than others, but unless you're also not watching any TV's, computer screens, or phones after sunset, it's a bit of a moot point. My POV is do what you can, but LED tech has come a long way from the early days and there are actually perfectly viable options out there should you so choose. They do cost more, but they also *should* last a lot longer than incandescents.

Btw this is not to say you should stop using incandescents — I fully agree they are the best. I am just trying to shed some light (pun intended!) in case anyone is interested.

The last thing I'll say if you are concerned about your circadian rhythms, is that the best thing you can do is view the sunrise and sunset. Outdoors. Ideally 20min of sunlight when you wake up (as soon as possible), and then a bit in the evening as it's going down with warmer spectrum. That will help set your body clock (with light) better than anything.

Sorry for hijacking, hope it was mildly interesting
Great discussion and what an awesome post on LED lighting. You addressed pretty much all of the concerns that @drivesitfar had brought up. No hijack there at all.

Hue remains easily the most reliable lighting (and most expensive) in our home, aside from the outdoor motion sensors which I would not recommend. The 12V BTF with the WLED controller is as plug and play as it gets with “diy” led and the end result with 60 LED per meter strips is very impressive. The ones I have can be cut every few inches and I would have 100% gone that way for undercounter if I had this information then. That said, the IKEA Tradfri under cabinet lighting with the Zigbee enabled Tradfri drivers have been flawless. That lighting was also a snap to install.
 

King Luis

Member
Joined
Oct 28, 2025
Messages
5
Decided to "panel" the remainder of exposed walls with slatwall. Accents will be done in "Noble Grey". I like the warm look of the slat wall. Consequently, I have 10 sheets to clear coat..the lift came in handy as another work surface :)

slat1.jpg

slat2.jpg


i know this is a super old post, but i'm also new here. whats that slat wall called? is it wood or mdf? how is it for holding heavier stuff like skis or shovels, etc?
 
OP
D

Denwood

Well-known member
Joined
Sep 22, 2014
Messages
4,172
Location
Thunder Bay, Ontario, Canada
i know this is a super old post, but i'm also new here. whats that slat wall called? is it wood or mdf? how is it for holding heavier stuff like skis or shovels, etc?
It’s stocked at Home Depot, or any specialty plywood retailer:


1768595593379.png

Slat wall like this is surprisingly strong. My hoist arms (heavy) live on 2 slat wall brackets without issues. If you screw the brackets in (thru slat wall and into a stud or ply sheathing) , it gets even stronger so 80-100 pounds per slat hook is no problem. I think every shop should be panelled with this stuff! If you really push things, the slat wall will separate locally, but just where the hook is..and you can repair with glue and a screw. This has only happend once, and it was on the hoist arms for the lift as I was using longer slatwall brackets. With a very heavy weight, if you keep it close to the slat wall, it will not cause issues.

As a reference, with 30lb point load on a bracket 12" away from the wall, (30 ft lbs of torque), MDF slatwall will be approaching its limit, so keep under that and you're golden. Given those specs, a 90 pound load, 4" from the wall would be the limit. If you use a screw in the provided spot provided on every bracket/hook you could increase that load further, providing the bracket itself can support it.

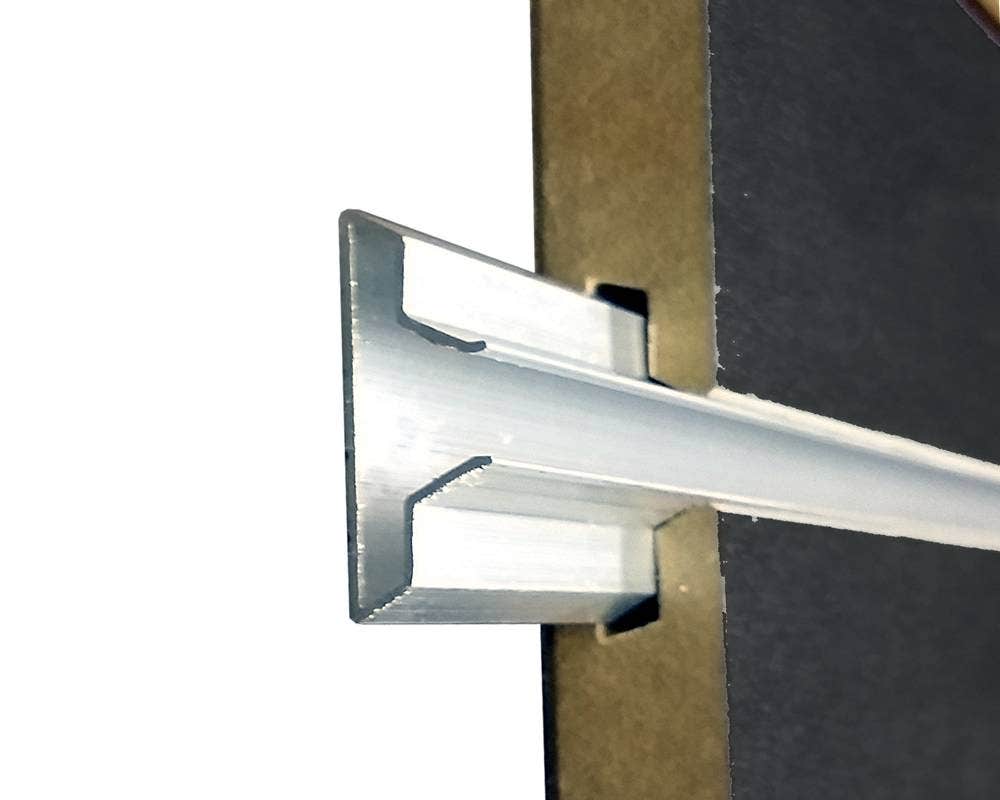
You can also purchase aluminum slat wall inserts like this which take load up something to 90 ft lbs, 3 times stronger than without the insert in "bare" MDF. If you do use the inserts, you'll have much tougher time putting a screw into the hook/brackets though.

1768624678759.png

You can find a ton of hooks etc. online:


I sprayed the panels with clear urethane to make them somewhat cleanable once mounted up.
 
Last edited:

drivesitfar

Well-known member
Joined
Oct 23, 2013
Messages
35,965
Location
Pacific Northwest
Nicho: great write up!! Since I am just turning 70 and I’ve got a couple decent size storage boxes full of old filament light bulbs I doubt I’ll ever need to use your information. Also I think I heard old filament bulbs will be for sale again in the stores.

That said when I updated my parents 100 year old home I bought led lighting for it to brighten up and show off the new paint job do I’ve got a few led bulbs I’ll use in my small garage. When I build my new smell shop I’ll address the lighting issue more then cause I’d probably spend more than a few minutes in there.

As far as sunshine Seattle certainly isn’t known for anything but winter cloudy drizzle but as you can see from this morning’s picture the sun does come around a few days. Our sunsets from our living room or deck aren’t bad either and as soon as I finish replacing our old wood deck boards with timber tech we will spend a lot more time outside. IMG_0334.jpegIMG_0335.jpegIMG_0333.jpegIMG_0249.jpegIMG_8162.jpeg
 

PhantomEB

Well-known member
Joined
Feb 6, 2006
Messages
6,648
Location
Medicine Hat, AB, Canuckistan
One of the non-obvious benefits to the Govee lights is that with devices like the HUE outdoor (wireless) motion sensor, you really don't need outside floods anymore. At full brightness they pretty much light up the yard. In new construction, installing outlets in soffits is not a terrible idea...
yup bigger fan of Dusk to dawn everywhere That I can put them. Was gonna run dusk to dawn on sideyard but don’t need to light up the yard where we sleep. Outdoor fans are going where I bbq.
 
OP
D

Denwood

Well-known member
Joined
Sep 22, 2014
Messages
4,172
Location
Thunder Bay, Ontario, Canada
@drivesitfar , your view looks a lot warmer than mine. Just finished 2 hrs on the fat bikes…must be 4-5 feet of snow on the bush right now, and more coming!

@PhantomEB , my neighbour across the street likes the lighting more than we do I suspect. Every new lighting scheme that resonates, we get a text with a picture from her living room…ha.
 

nicholam77

Well-known member
Joined
Dec 18, 2016
Messages
2,652
Location
Minneapolis, MN
Nicho: great write up!! Since I am just turning 70 and I’ve got a couple decent size storage boxes full of old filament light bulbs I doubt I’ll ever need to use your information. Also I think I heard old filament bulbs will be for sale again in the stores.

Yeah, then I'd just stick with what you've got!

As far as sunshine Seattle certainly isn’t known for anything but winter cloudy drizzle but as you can see from this morning’s picture the sun does come around a few days. Our sunsets from our living room or deck aren’t bad either and as soon as I finish replacing our old wood deck boards with timber tech we will spend a lot more time outside.

Wow, that is a killer view with the mountains!! Color me extremely jealous! It is very difficult to view the sunset from the vantage point of our house, which is a huge bummer to me. If I had your view I'd be out on that deck every night!
 
OP
D

Denwood

Well-known member
Joined
Sep 22, 2014
Messages
4,172
Location
Thunder Bay, Ontario, Canada
Two minute short on fixing up an older Venmar HRV (my Dad's) with a damper motor failure. The assembly is discontinued from Venmar which normally would have most folks just tossing the entire HRV. Fortunately I found a US company that stocks the rather odd 120V damper motor (most now are 24 V)


Part# 13734 (Discontinued!)

1769022468373.png


Fits the following VanEE air exchangers:

90H
190H
90H Novo + (1601607-1601609)
190H Novo + (1601619)

Fits the following Venmar AVS air exchangers:

Solo 1.5 (43720)
Solo 2.0 (45720)
Duo 1.2 (43710)
Duo 1.4 (43700)
Duo 1.9 (45700)
Constructo 1.5 (43110)
Constructo 2.0 (45110)
ERV Constructo Quattro 1.5 and 2.0
Novofit 1.5 and 2.0.


The repair part:

https://retrozone.com/38586r-synchron-motor.html

Often used on these ERV branded systems:
Venmar, Flair ,vanEE, Conformax, NuTone,
Carrier, Bryant, Payne, Heil, York, Sears OPTIMUM,
Guardian by Broan

38586R Synchron Motor (Clockwise)

1769022530718.png

39162L Synchron Motor (Counterclockwise)

1769022540735.png
 
Last edited:
OP
D

Denwood

Well-known member
Joined
Sep 22, 2014
Messages
4,172
Location
Thunder Bay, Ontario, Canada
I ended up replacing the 2nd Synchon motor in my FrankenHRV (same model as my Dad's, but gutted) so shot a quick video. Don't watch unless you have a latent interest in repairing damper motors :) Ha.

I sent a link to the folks at Retrozone who immediately offered to offset some of my expense. That was rather cool of them as I sent them a link with no expectation of anything but a thanks. I think it's a lesson in the value of being a nice guy, with no expectations :) That Synchron motor is not inexpensive by any stretch once landed here in Canada, but a few $100 in expense along with an hour or less of labour and you're keeping a $2000 piece of ventilation equipment out of the landfill.

 
OP
D

Denwood

Well-known member
Joined
Sep 22, 2014
Messages
4,172
Location
Thunder Bay, Ontario, Canada
Playing around with lighting again and boy does it ever complicate things in the shop. Setup time *****, and then there’s the issue of exposing things correctly, getting color temp right, correct focus, audio…sheesh. I shot a bit this evening and honestly it was a bit of a disaster. I did manage to put this together, pretty much a 60 second quick overview of the rig I am using to shoot everything on an iPhone 15 pro max. I’ve been building it out based on function over the last year.

 
OP
D

Denwood

Well-known member
Joined
Sep 22, 2014
Messages
4,172
Location
Thunder Bay, Ontario, Canada
This is one of my favourite shop projects to date. I needed another tool cart for the shop, but I was also looking for a work table / filming platform that I could wheel around when required. The tool cart is a bit of a beast and will be in the shop until I'm too old to work in it anymore.

The height adjustable tool cart and the LVP plank (LifeProof Oak Chiffon from HD) I used to make the table. My daughter danced in our basement "studio" on LVP with metal tipped tap shoes for nearly a year during Covid, so I figure LVP (with 30 mil wear layer) is about as good as anything. The tap floor had zero damage! I think I pulled nearly every wood working tool in my shop out of the corners including the new router setup with 1/2" shank...loving the upgrade from 1/4".

This is the first new 1/2" bit for the collection (affiliate link), used to trim the LVP back to the plywood base. It's a beast!

1773782186092.png


Still 2026-03-10 122711_3.1.1.jpg

Some puck magnets (to hold the table in place securely), 3/4 birch ply and 4 lengths of LVP and this is the end result :)

table 2026-03-10 122411_2.1.1.jpg

Here's the full build video:

 
Last edited:

nicholam77

Well-known member
Joined
Dec 18, 2016
Messages
2,652
Location
Minneapolis, MN
The new table is looking 'minty' Dennis! I enjoyed the video. It's fun to see your thought process and how you tackle a woodworking project.

I've mostly stayed away from 'narsty' finishes, but I'm always interested in what others use to finish wood projects.

Video + audio quality is looking and sound A+.
 
OP
D

Denwood

Well-known member
Joined
Sep 22, 2014
Messages
4,172
Location
Thunder Bay, Ontario, Canada
@nicholam77, Nick, that video was literally crickets with regard to play count…but it sure look many hours to shoot and edit. I’m doing everything on the pro max 15 and now 17 in apple log/prores, doing colour matching using a SpyderChekr24 chart, blah, blah. I have two 32” calibrated monitors and am using scopes etc as I learn more, but the YT encode seems to ramp contrast beyond my liking. In my previous life we worked with stupidly expensive cameras but so did our customers. Working with the iPhone is quite a contrast. For YT “requirements” iPhones finally become good enough IMHO at about the 15 pro max, with good light. No DOF to speak of but a pretty streamlined workflow all things considered.

After all that effort on this video, I compare it to a 3 minute YT short I did on the Milwaukee vs air tool comparison, edited in 30 minutes, shot in maybe 20 minutes… and that one has 280K plays and counting. Go figure. It is interesting to be monitized, collecting my first payment of around $100 last month.

Learning has been a blast. I really appreciate your comments, particularly given your skill set! That table will serve as my background for overhead shots of hardware etc. but I suspect I will use it all the time as a real work table too.
 
Last edited:

drivesitfar

Well-known member
Joined
Oct 23, 2013
Messages
35,965
Location
Pacific Northwest
I watched your entire video and it has a ton of good information and looks like a great addition to your shop.

I watched more than a few really nice oak hardwood floors get removed and tossed in the trash or covered up with carpet or worse vinyl and happy to see you repurpose some old maple. I love my planer too and so far I’ve mostly ran new cedar boards thru it. Not sure if your wood already had nails taken out but it appears you did make sure they were out before planing them.

How does the new table work with the little magnets keeping it in place?

I’m not sure how YT is on paying or posting but your part of the world is so beautiful especially in summer you might post up more drone short vids of your favorite places that I’m sure many would enjoy.

Hope you’re thawing out and starting to enjoy the warmer weather. We just got hit with 6 inches of snow a couple days ago and it’s almost completely gone this morning. It was our first snow of this crazy winter where we’ve had almost 60 degree days in January and February


IMG_0668.jpeg
 

PhantomEB

Well-known member
Joined
Feb 6, 2006
Messages
6,648
Location
Medicine Hat, AB, Canuckistan
One of the non-obvious benefits to the Govee lights is that with devices like the HUE outdoor (wireless) motion sensor, you really don't need outside floods anymore. At full brightness they pretty much light up the yard. In new construction, installing outlets in soffits is not a terrible idea...
I have the material list to extend 3 circuits up to soffit height as well right to where my current runs all start at.
 
OP
D

Denwood

Well-known member
Joined
Sep 22, 2014
Messages
4,172
Location
Thunder Bay, Ontario, Canada
I watched your entire video and it has a ton of good information and looks like a great addition to your shop.

I watched more than a few really nice oak hardwood floors get removed and tossed in the trash or covered up with carpet or worse vinyl and happy to see you repurpose some old maple. I love my planer too and so far I’ve mostly ran new cedar boards thru it. Not sure if your wood already had nails taken out but it appears you did make sure they were out before planing them.

How does the new table work with the little magnets keeping it in place?

I’m not sure how YT is on paying or posting but your part of the world is so beautiful especially in summer you might post up more drone short vids of your favorite places that I’m sure many would enjoy.

Hope you’re thawing out and starting to enjoy the warmer weather. We just got hit with 6 inches of snow a couple days ago and it’s almost completely gone this morning. It was our first snow of this crazy winter where we’ve had almost 60 degree days in January and February


IMG_0668.jpeg
That looks beautiful Drives :). Thanks for watching the video which is a bit of a time investment at 34 minutes! The puck magnets are each rated to 70 lbs, so more than enough to keep the table very secure (there are 8 of them!) even with the small gap between the tool cart steel and the magnet surface. They are rare earth magnets but enclosed in steel cup which works to concentrate the magnetic force even further. I use them all the time for projects. Drone "beauty shots" are certainly cool for you and me, but most folks have seen so much of these that they are not so interested anymore :-(

This one though is a cool hyperlapse I took last year at -35C:

 
OP
D

Denwood

Well-known member
Joined
Sep 22, 2014
Messages
4,172
Location
Thunder Bay, Ontario, Canada
I have the material list to extend 3 circuits up to soffit height as well right to where my current runs all start at.
That's a great idea and honestly should be part of every new build. I'd probably add a few CAT6 runs to corners in the attic for new builds as well to make it easier to install POE WIFI extenders, cameras etc.
 
To avoid these ads, REGISTER NOW!
Top Bottom