To avoid these ads, REGISTER NOW!

Above 1200 Sq/FT Garage Refurb®

Wokspaces above 1200 squarefeet.

NUTTSGT

Super Moderator
Staff member
Joined
Sep 14, 2009
Messages
50,806
Location
Northern Central Ohio
EDIT: I'm in the process of updating the "broken internet" compliments of PB.


Well, it has begun. We bought this house and garage over 10 years ago. My garage like in some previous posts started life as a service station, in 1937. One of the things I've wanted to do from the beginning is pour a new floor. The current concrete is spalled and rough. When it rains hard, I occassional get water inside because it's so low.
The planets have finally aligned in my favor. While I have everything out, I figured it was the right time to repaint the walls. I'm going to go with white to try and brighten it up.
First order of business, move everything out.
Here's the back room, which was empty. Basically a storage room and houses the air compressor.
091010garagemakeover001.jpg

Another shot of what all has to come out,
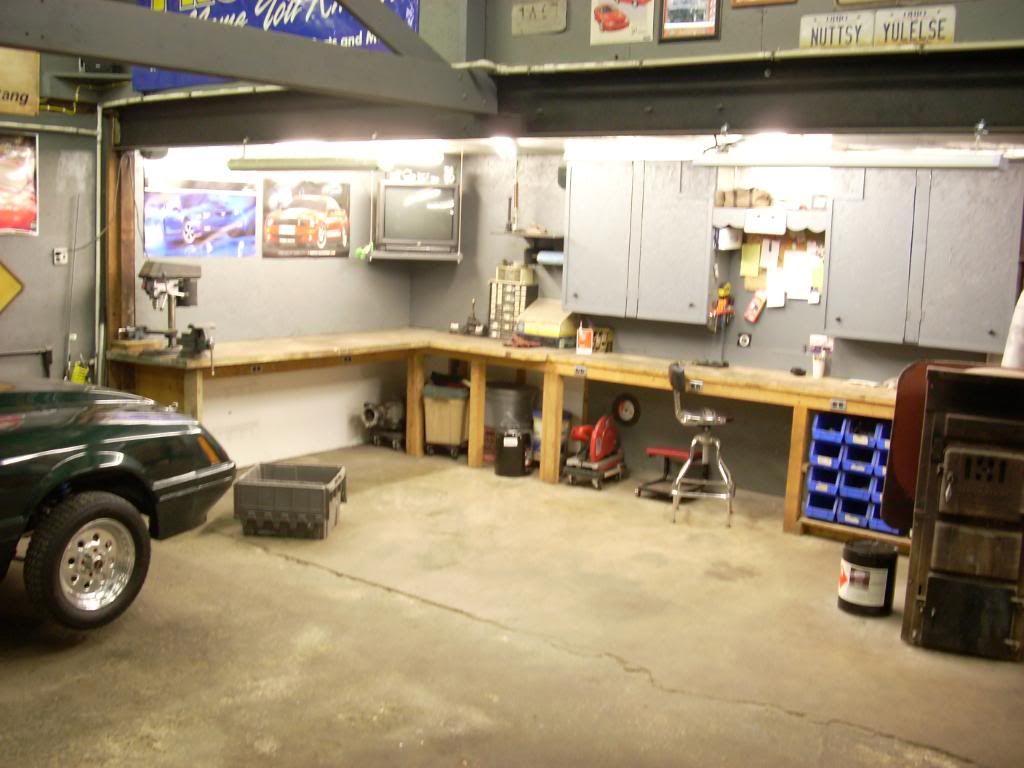
091010garagemakeover004.jpg

along with the back corner of the garage.
091010garagemakeover005.jpg
 

Attachments

  • 091010 garage makeover 001.jpg
    091010 garage makeover 001.jpg
    132.2 KB · Views: 1,598
  • 091010 garage makeover 004.jpg
    091010 garage makeover 004.jpg
    132.6 KB · Views: 1,848
  • 091010 garage makeover 005.jpg
    091010 garage makeover 005.jpg
    132 KB · Views: 1,692
Last edited:
To avoid these ads, REGISTER NOW!
OP
N

NUTTSGT

Super Moderator
Staff member
Joined
Sep 14, 2009
Messages
50,806
Location
Northern Central Ohio
Re: garage refurb

Now that little back room has four bare engine blocks plus another shortblock and a transmission plus more. I failed to remember how much junk I have.

One of the first things to come out was my tool box and step-dads box. Along with the press and one big *** wood burner. The press moved fairly easy with a two wheeled dolley. The tool boxes, weren't bad, as I had help from my loving wife (a round of applause for her please). The wood stove was a beast, 500 pounds I'd guess. I, along with the wife, got the wood stove on a couple of mover's dolleys from HF. Then they rode on the plywood express.
091010garagemakeover010.jpg


091010garagemakeover008.jpg
Here's the two sheets of 3/4" plywood. I leap frogged one sheet after another. I told the wife this is how they built the pyramids.lol
 

Attachments

  • GR04.jpg
    GR04.jpg
    109 KB · Views: 251
  • GR05.jpg
    GR05.jpg
    112.4 KB · Views: 222
Last edited:
OP
N

NUTTSGT

Super Moderator
Staff member
Joined
Sep 14, 2009
Messages
50,806
Location
Northern Central Ohio
Re: garage refurb

091010garagemakeover012.jpg Almost empty.

091010garagemakeover014.jpga gaggle of **** that I had to move, you can see that the back room is slightly full. As I was moving stuff, I had to keep in mind if I was going to need it during the refurbish. parts washer, blast cabinet, welder, welding table, the list goes on

Since It's getting a new floor, raised 4" the work benches had to come all the way out. I can't believe what a pita this was. 091010garagemakeover015.jpg When I insulated the back walls, I sheet right down to the bench top. So the OSB and insulation had to be moved also.
 

Attachments

  • GR08.jpg
    GR08.jpg
    83.9 KB · Views: 224
  • GR07.jpg
    GR07.jpg
    82.4 KB · Views: 226
  • GR06.jpg
    GR06.jpg
    78.6 KB · Views: 246
Last edited:
OP
N

NUTTSGT

Super Moderator
Staff member
Joined
Sep 14, 2009
Messages
50,806
Location
Northern Central Ohio
Re: garage refurb

The back half of the garage had been added on many years ago. When they did, they added the black I-beam. One end sat on a 2x6 and 2x4. I was never keen on that but it worked. I decided to spruce it up a bit and take them out replace them.
091010garagemakeover018.jpg basement jack in place. You can also see the window I bricked up when we bought the place. They sided the outside with T-111, but left the window in place. I don't claim to be a mason either. ha ha ha

091010garagemakeover019.jpg New double 2x6 beam in place. If you notice the gap on the right side, that was another WTF moment. Apparently they laid the block for the addition right up to the old asbestos siding and cut a hole in the back wall. I had to recut the siding boards for the 2x6s to sit flush. A 45 minute job turned into a 2 1/2 hour job.
 

Attachments

  • GR09.jpg
    GR09.jpg
    66.2 KB · Views: 208
  • GR10.jpg
    GR10.jpg
    74.9 KB · Views: 205
Last edited:
OP
N

NUTTSGT

Super Moderator
Staff member
Joined
Sep 14, 2009
Messages
50,806
Location
Northern Central Ohio
Re: garage refurb

Same view as above but a slightly different angle.
091010garagemakeover020.jpg
Notice switch/outlet hanging out of the wall? Well they previous owner had wired the bench outlets out of that box. Since the bench was gone, the wiring needed to go too. Not to mention the 14 gauge wire. I've done some rewiring in the garage and knew it was feed by a 14ga wire but was planning on replacing it. Now was the time.

091010garagemakeover021.jpg
I used a 2x6 (old bench top) as a nailer for the new work bench. I wanted to get this in place so I could screw the OSB back onto the walls. That's one less thing in the way. I've shortened the bench up by a foot and a half, to keep it away from the woodburner. Something I've been thinking about for a while.

Since I'm raising the floor, it's going to make the cabinets to close to the benchtop. So they will need to be shortened. No big deal but they will have to come off the wall and I wonder what surprises I will find.

I had to remove all the insulation in the back corner too. I'm glad I screwed the OSB on instead of nailing it on. Here's a before pic, I will have to get an after pic.
091010garagemakeover016.jpg


The current to do list for now,

shorten wall cabinets
remove a fan mounted up on the wall (to push warm air down in the winter, 14' ceiling)
paint
probably level out the ceiling in the back corner ( a screw up years ago)
 

Attachments

  • GR13.jpg
    GR13.jpg
    73.2 KB · Views: 163
  • GR12.jpg
    GR12.jpg
    80.6 KB · Views: 172
  • GR11.jpg
    GR11.jpg
    89.7 KB · Views: 174
Last edited:

JC23

Well-known member
Joined
Dec 31, 2009
Messages
11,718
Location
Northcoast
Re: garage refurb

You hang in there, NUTT,

It's always tougher to re-do sh!t than build new. But at some point, the work will turn from old to new. That's when your afterburner will kick in and you'll see some real progress!

Where is Sulphur in Ohio???
 
OP
N

NUTTSGT

Super Moderator
Staff member
Joined
Sep 14, 2009
Messages
50,806
Location
Northern Central Ohio
Re: garage refurb

Oh believe me, I know all about redo-ing ****. I'll have to scan a pic of the house when we first bought it and one now. I'll try to do the tommorrow, along with a couple of outside pics of the garage.

Sulphur Springs is about an hour north of Columbus.
 
OP
N

NUTTSGT

Super Moderator
Staff member
Joined
Sep 14, 2009
Messages
50,806
Location
Northern Central Ohio
Re: garage refurb

Sorry for the lack of updates. I've had a few unscheduled work days that threw off my schedule. I've accomplished a few things, I removed the wall mounted fan, no pictures, sorry. It was nothing more than a box fan mounted on a shelf. I took it down for repainted and future plans of lowering the ceiling.
Since I was raising the floor and work benches, it put the wall cabinets only about 8" off the workbench top. They needed raised up and the story continues.
09152010002.jpg

Here's where it starts, you can see the nailer for the future work bench in place. I figured I could remove the bottom shelf and that would work. So I took off the doors.
09152010003.jpg

More junk that I had to move. This is where I realized the bottom shelf was taller than the rest, which I needed for books and spray bottles/ aerosal cans. I added a nailer to the wall and some 1 1/2" styroam insulation (there wasn't any behind the cabinets).
09152010004.jpg

Once I started looking at one of the cabinets, I noticed the sides were in poor shape and needed a little work. Apart thatcabinet came and I built some new sides of 3/4" plywood and dadoed them out to for the shelves to slide into.
09152010005.jpg
09152010006.jpg
I'll be making the doors tomorrow out of 1/2" plywood and trimming them with strips made from 2x4 (1/4" thick)
 

Attachments

  • GR16.jpg
    GR16.jpg
    71 KB · Views: 151
  • GR18.jpg
    GR18.jpg
    79.9 KB · Views: 150
  • GR17.jpg
    GR17.jpg
    77 KB · Views: 142
  • GR15.jpg
    GR15.jpg
    86.3 KB · Views: 173
  • GR14.jpg
    GR14.jpg
    73.9 KB · Views: 171
Last edited:
OP
N

NUTTSGT

Super Moderator
Staff member
Joined
Sep 14, 2009
Messages
50,806
Location
Northern Central Ohio
Re: garage refurb

Some guys have asked about pics of my garage when I've mentioned it being an old sevice station, so I'll add a few of when we bought the house and garage. Afew of the old are scanned pics I uploaded and not sure how the size will be.

The garage when we bought it. Notice a few windows that have been removed.
001.jpg

What it looks like now.
09152010007.jpg
After the new floor is poured, I have doors that match the house garage to put up.

A view from the back.
09152010010.jpg
From the other side.
09152010009.jpg
I'd like to close in this corner and bring the roof (to match the other roof)out over the current roof and basically make it a outdoor accessible shed and get a few things out of the house garage, garden trailer, push mower, shovels/rakes. That'll hopefully be next spring.
 

Attachments

  • GR20.jpg
    GR20.jpg
    99.5 KB · Views: 185
  • GR21.jpg
    GR21.jpg
    124.9 KB · Views: 166
  • GR22.jpg
    GR22.jpg
    100.3 KB · Views: 151
  • GR19.jpg
    GR19.jpg
    39.8 KB · Views: 156
Last edited:

Rockey

Well-known member
Joined
Jun 1, 2010
Messages
168
Re: garage refurb

Is that a 4 eye I spy? You must be fairly close to Norwalk.

I like the garage. It has a bit of the old service station nostalgia to it.
 
OP
N

NUTTSGT

Super Moderator
Staff member
Joined
Sep 14, 2009
Messages
50,806
Location
Northern Central Ohio
Re: garage refurb

And to show what I had to start with on the house too. I told the wife to look at the potential of the property and think of what it could look like.

002.jpg

Same angle as above, just newer. I tore down the old garage, added a 24x32 onto the house, fancied the outside up with some siding, windows and new roof.
09152010008.jpg

In the beginning.
003.jpg
I ripped off the old porch and gave the wife the wrap around porch she wanted.
09152010011.jpg

We bought the front door about 2 years before we put it in, she picked it out. Then she tried to explain what she wanted the steps to look like. I couldn't understand what she was talking about . . . "curved, you know go around" I was like "huh?" :headscrat I told her to draw a picture. This is what she wanted, and I gave her a nice big sidewalk to match it.
09152010012.jpg
 

Attachments

  • GR25.jpg
    GR25.jpg
    34.8 KB · Views: 116
  • GR26.jpg
    GR26.jpg
    138.8 KB · Views: 133
  • GR23.jpg
    GR23.jpg
    33.4 KB · Views: 133
  • GR24.jpg
    GR24.jpg
    126.3 KB · Views: 138
  • GR27.jpg
    GR27.jpg
    122.4 KB · Views: 129
Last edited:
OP
N

NUTTSGT

Super Moderator
Staff member
Joined
Sep 14, 2009
Messages
50,806
Location
Northern Central Ohio
Re: garage refurb

Is that a 4 eye I spy? You must be fairly close to Norwalk.

I like the garage. It has a bit of the old service station nostalgia to it.

Yep, 86 GT and about 40 minutes to Norwalk.

A few winters ago in the garage. I got bored. :lol_hitti
1019082127a1.jpg
 

Attachments

  • GR28.jpg
    GR28.jpg
    31.8 KB · Views: 138
Last edited:
OP
N

NUTTSGT

Super Moderator
Staff member
Joined
Sep 14, 2009
Messages
50,806
Location
Northern Central Ohio
Re: garage refurb

Well things haven't been working out to good lately and progress has been horrible. Things just went to **** today and I was stressed and about 10 shades of pissed.

I was going to rent a cut off saw to cut the concrete but figured I'd use a circular saw with a masonary blade. It worked before but it's hard onthe saw. So now I have Skil saw that I can use for "junk" work and keep my Dewalt circular saw nice.'

I used two box fans to push the dust out of the garage as I cut.
09212010garage001.jpg

Here's a little progress.
09212010garage003.jpg
09212010garage006.jpg

My step dad came over with a water level today, we marked the perimeter for the concrete. I had it figured to pour 3.5" at the very back of the garage, which is higher. I knew there would be some low spots as the floor sloped. I didn't realize just how much til today.

Keep in mind the back will be 3 1/2" thick. (that pic disappeared FOUND ) This is at the northeast corner.
09212010garage004.jpg
09212010garage005.jpg

yep, that's 6 1/2 inches, I think I'm going to need more than the 13 yards I originally figured. . . . and that's how my day started. I'm planning on pouring Saturday, hopefully I can get some stuff done tomorrow.
 

Attachments

  • GR33.jpg
    GR33.jpg
    95.6 KB · Views: 99
  • GR32.jpg
    GR32.jpg
    140.9 KB · Views: 100
  • GR31.jpg
    GR31.jpg
    125.5 KB · Views: 99
  • GR29.jpg
    GR29.jpg
    71.6 KB · Views: 107
  • GR30.jpg
    GR30.jpg
    145.6 KB · Views: 97
Last edited:

colt zantop

Well-known member
Joined
Apr 20, 2006
Messages
5,422
Location
michigan
Re: garage refurb

wow..nice work! I love the old station! I do have one problem though......DONT GET RID OF THOSE DOORS ON THE OLD STATION!!! they look period correct...just paint them to match!!! :)
 

klogan121

Well-known member
Joined
Jan 23, 2010
Messages
113
Location
Linden, MI
Re: garage refurb

Regarding heating your shop, what style of woodburner you using- 2 55 gallon drums, a potbelly stove, or a unit with a built-in fan? I'm leaning to wood burning as a source of heat for my pole barn and was just curious.

Nice resto on the house!

Kevin
 
OP
N

NUTTSGT

Super Moderator
Staff member
Joined
Sep 14, 2009
Messages
50,806
Location
Northern Central Ohio
Re: garage refurb

wow..nice work! I love the old station! I do have one problem though......DONT GET RID OF THOSE DOORS ON THE OLD STATION!!! they look period correct...just paint them to match!!! :)

Sorry, those doors are junk, rotting at the bottom and one has a broken spring causing it to have to be held open with a post. I already have doors to put on, they match the doors on the house garage except no windows.
 
OP
N

NUTTSGT

Super Moderator
Staff member
Joined
Sep 14, 2009
Messages
50,806
Location
Northern Central Ohio
Re: garage refurb

Regarding heating your shop, what style of woodburner you using- 2 55 gallon drums, a potbelly stove, or a unit with a built-in fan? I'm leaning to wood burning as a source of heat for my pole barn and was just curious.

Nice resto on the house!

Kevin

It's a big monster. You can see it in this picture. According to my neighbor, it's an old boiler type wood burner. It puts out the heat. I can try to get a better picture tomorrow.
garage001.jpg

I love burning wood, it's good exercise to cut it, cheap, and puts out the heat. Between gas for my truck, gas/oil for the saw, maybe a chain and some lunch, I might spend a hundred bucks to heat my garage in the winter.

EDITED. Here is a better pic of it.
09242010003.jpg
 

Attachments

  • GR34.jpg
    GR34.jpg
    98.8 KB · Views: 119
  • GR35.jpg
    GR35.jpg
    91.6 KB · Views: 107
Last edited:

JC23

Well-known member
Joined
Dec 31, 2009
Messages
11,718
Location
Northcoast
Re: garage refurb

Diggin the old gas station vibe as well as all the great work on the house. NICE!

You going to make the front of the shop look like an old shop with a sign or stuff like that?
 
To avoid these ads, REGISTER NOW!

jktruck150

Well-known member
Joined
Oct 19, 2009
Messages
835
Location
Outskirts of Jackson, MS.
Re: garage refurb

That place is awesome! You have a good deal of work, and it shows! I see properties all the time where I tell my wife.. "I can fix that!" She says she can too, with a bulldozer. Some just don't see the potential. I am glad yours did! Nice shop!
 
OP
N

NUTTSGT

Super Moderator
Staff member
Joined
Sep 14, 2009
Messages
50,806
Location
Northern Central Ohio
Re: garage refurb

Diggin the old gas station vibe as well as all the great work on the house. NICE!

You going to make the front of the shop look like an old shop with a sign or stuff like that?

Nah, just going to try to make it look more like the house. I have enough people stop now and ask for directions. :beer: Besides that, there's too many low lifes in the area.
 
OP
N

NUTTSGT

Super Moderator
Staff member
Joined
Sep 14, 2009
Messages
50,806
Location
Northern Central Ohio
Re: garage refurb

That place is awesome! You have a good deal of work, and it shows! I see properties all the time where I tell my wife.. "I can fix that!" She says she can too, with a bulldozer. Some just don't see the potential. I am glad yours did! Nice shop!

When we looked at the house, I told the wife to look at the potential. She couldn't quite understand til I actually drew her a picture (seriously) or sketch of what the house would look like with a porch on it like she wanted.
 

Joe From NY

Well-known member
Joined
Feb 25, 2010
Messages
527
Location
NY
Re: garage refurb

The back half of the garage had been added on many years ago. When they did, they added the black I-beam. One end sat on a 2x6 and 2x4. I was never keen on that but it worked. I decided to spruce it up a bit and take them out replace them.
091010garagemakeover018.jpg

091010garagemakeover019.jpg
New double 2x6 beam in place. If you notice the gap on the right side, that was another WTF moment. Apparently they laided teh block for the addition right up to the old asbestos siding and cut a hole in the back wall. I had to recut the siding boards for the 2x6s to sit flush. A 45 minute job turned intoa 2 1/2 hour job.

i would replace the wood with brick or steel. you might put a chain hoist on that beam someday.
 
OP
N

NUTTSGT

Super Moderator
Staff member
Joined
Sep 14, 2009
Messages
50,806
Location
Northern Central Ohio
Re: garage refurb

Sorry Joe, that though has been abandoned years ago. The beam is only 7 feet off the ground, too low and once the benches are back in place, too close to them.
 
OP
N

NUTTSGT

Super Moderator
Staff member
Joined
Sep 14, 2009
Messages
50,806
Location
Northern Central Ohio
Re: garage refurb

My neighbors came over with his Cub Cadet that has a loader bucket. It made pulling up the black top easy.
09242010004.jpg

Everything dug out, drilled some holes for the rebar.
09242010005.jpg

Even cut back some of the siding and door trim.
09242010006.jpg
 

Attachments

  • GR37.jpg
    GR37.jpg
    147.5 KB · Views: 80
  • GR36.jpg
    GR36.jpg
    150.9 KB · Views: 71
  • GR38.jpg
    GR38.jpg
    109.1 KB · Views: 73
Last edited:
OP
N

NUTTSGT

Super Moderator
Staff member
Joined
Sep 14, 2009
Messages
50,806
Location
Northern Central Ohio
Re: garage refurb

Here's what it look like from the outside this morning.
09242010007.jpg

Here's a little closer shot, you can see the rebar in this shot. I'll try to get a better shot of the rebar today, as tommorrow it will be covered with concrete.
09242010009.jpg
 

Attachments

  • GR41.jpg
    GR41.jpg
    119.9 KB · Views: 75
  • GR40.jpg
    GR40.jpg
    130.3 KB · Views: 72
Last edited:

aqr81

Well-known member
Joined
Jul 20, 2010
Messages
1,127
Location
Central Valley, Ca.
Re: garage refurb

Eric, this place looks awesome! You have been working your @$$ off and it really shows. The house looks great, what an improvement. I'll bet the wife loves the porch. The shop is outstanding...love that it's an old service station, lot's of appeal. It's too bad those doors are rotten and beyond salvaging. It would be nice to keep them. Keep up the good work Eric. :thumbup:
 

markviii

Well-known member
Joined
Jan 25, 2010
Messages
1,310
Location
east central IL
Re: garage refurb

Lots of great work on this project which fulfills your vision! I congratulate your wife for her vision as well. The wrap-around porch and the front stairs were a great addition to the house. It's also nice having your working garage close to the house, but not attached. We have the same problem with people stopping by the shop asking for directions or help from the mechanic. No windows on the restored garage is also a good idea for security. We finally learned on the newest buildling we completed this year.

Having "the vision" is an awesome thing. Tom (BB767) and I have been married 35 years. It took about 15 of that to finally give in to his "visions". It's amazing how what he sees in his head come to reality with lots of hard work. Our son helps him with some of the heavy lifting.

I finally learned to pitch in and help in my limited way - which was mostly keeping out of the way and taking up the slack with other necessary work he wasn't finding time to do. I now do most of the maintenance on our 5 apartment buildings and around the house while he restores/improves the 5-acre property where we'll build our retirement home in the next few years. Three years ago I helped rake in 3 acres of grass seed (and I do the watering to get the grass good and established while he's away).

Chris
 
OP
N

NUTTSGT

Super Moderator
Staff member
Joined
Sep 14, 2009
Messages
50,806
Location
Northern Central Ohio
Re: garage refurb

Well, it's been a long two days. I was trying to get stuff ready to pour and other stuff, trying to do stuff the hard way. I got to bed last night (this a.m.) at about 3.
I dug out the back corner for a future "shed" project, but forgot to get a pic after it was poured, I'll get one tommorrow.
09252010001.jpg\

We poured (had to wheel it to the back)the offset in the back first, then worked that side forward to the door. Here's my father in law bull float it out.
09252010002.jpg
Another view, with my BIL Jim in the background, and my other BIL Pat floating out the angle in front of the door.
09252010003.jpg

Here's a shot of me, smiling my *** off, (I never show my teeth when I smile, but I'm so happy right now that I am) and happy to finally getting my new floor. I have been waiting several years for this.
09252010006.jpg
 

Attachments

  • GR43.jpg
    GR43.jpg
    97.8 KB · Views: 90
  • GR44.jpg
    GR44.jpg
    124.9 KB · Views: 89
  • GR42.jpg
    GR42.jpg
    135.9 KB · Views: 87
  • GR45.jpg
    GR45.jpg
    99.1 KB · Views: 95
Last edited:
OP
N

NUTTSGT

Super Moderator
Staff member
Joined
Sep 14, 2009
Messages
50,806
Location
Northern Central Ohio
Re: garage refurb

Jim and I discussing who had the bigger loads.
09252010007.jpg

I think the wife was checking out my ****. LMAO, literally.
09252010011.jpg


My FIL running the power trowel while Pat floats and trowels the edges where the power trowel can't reach.
09252010013.jpg
 

Attachments

  • GR46.jpg
    GR46.jpg
    104.4 KB · Views: 81
  • GR48.jpg
    GR48.jpg
    58.3 KB · Views: 82
  • GR47.jpg
    GR47.jpg
    90.7 KB · Views: 76
Last edited:
OP
N

NUTTSGT

Super Moderator
Staff member
Joined
Sep 14, 2009
Messages
50,806
Location
Northern Central Ohio
Re: garage refurb

Man, I hope whoever designed and built the first front dump concrete truck is a millionare, these things make pouring concrete easier. What's even better is having a GOOD driver that works with the crew rather than some that want to dump and go.
09252010005.jpg


As Pat was troweling out the edge by the door and had it nice, we got a slight bit of a surprise. Bode, our yellow Lab thought he was going to go see Pat.
09252010014.jpg


16.5 yards down and sealed, my lower back is sore, my hands, feet and legs hurt, and basically wore out. I hope I can stay awake to watch UFC 119. Time to relax.
 

Attachments

  • GR50.jpg
    GR50.jpg
    138.6 KB · Views: 77
  • GR49.jpg
    GR49.jpg
    122.8 KB · Views: 69
Last edited:
OP
N

NUTTSGT

Super Moderator
Staff member
Joined
Sep 14, 2009
Messages
50,806
Location
Northern Central Ohio
Re: garage refurb

WE smoothed the prints back out. Having a spot like that in the concrete where water can collect and freeze in the winter is something I did not want.
 
OP
N

NUTTSGT

Super Moderator
Staff member
Joined
Sep 14, 2009
Messages
50,806
Location
Northern Central Ohio
Re: garage refurb

Thanks Thumper.

Not much been going on the last few days, work, rain, rain, work, rain.

I did form up and pour a step going into the bathroom and another that goes from one side of the garage to the other.

10052010001.jpg


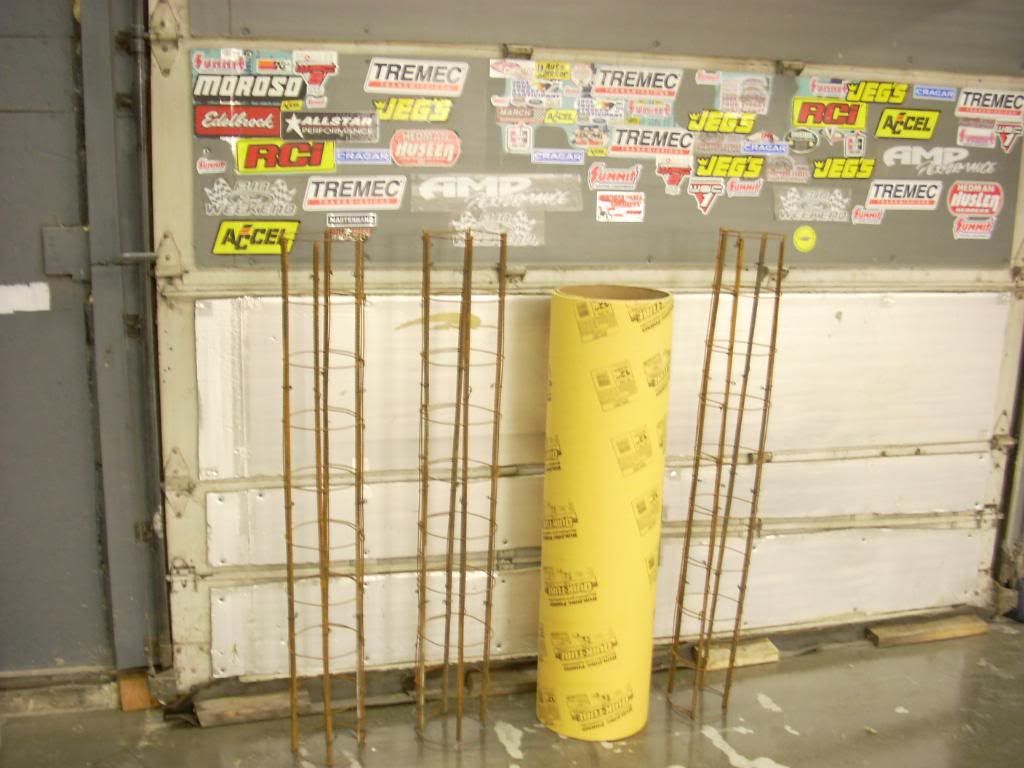
The next big step is pouring the apron out front. I want to put an overhang on the front of the garage. When I do this, I want to set a couple of 4x4s oneach side of the garage doors to support it. I bought some Portland cement and a ton of sand, already had the stone. I fabbed up some rebar and wire reinforcement to put in the tubes to make the columns.
10052010004.jpg


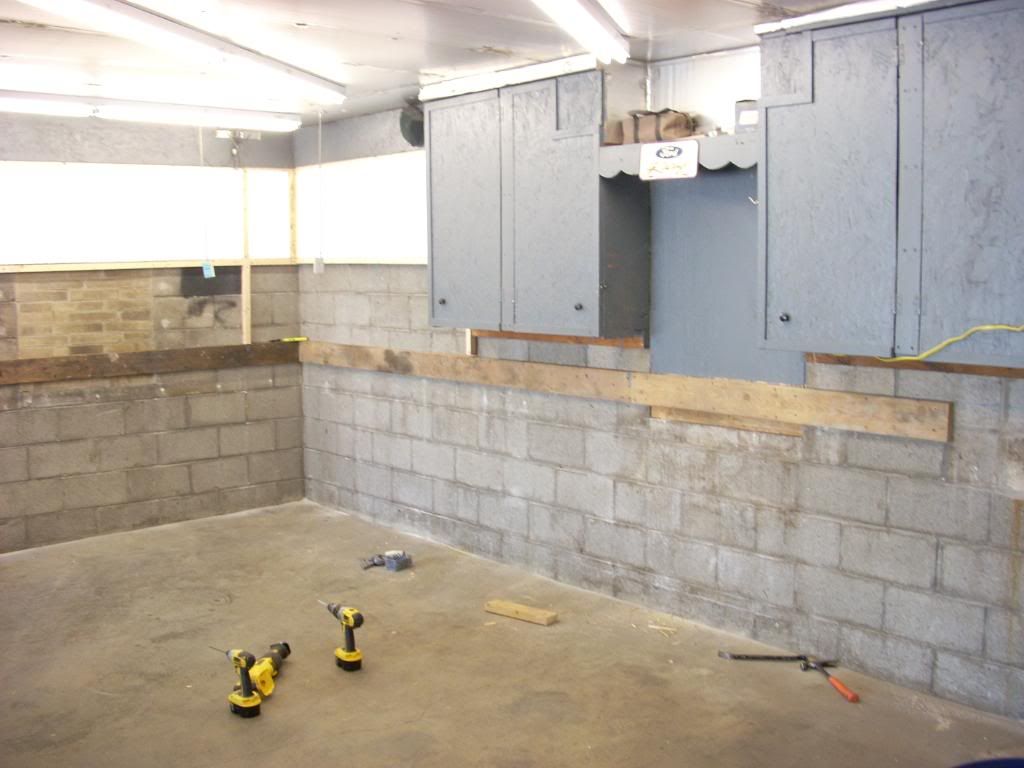
Since it's been raining, I started to get the inside repainted. I'm trying to lighten it up, from the gray to white. There's alot of trimming to do, what a pain in the ****.

10052010002.jpg
 

Attachments

  • GR52.jpg
    GR52.jpg
    72.3 KB · Views: 77
  • GR54.jpg
    GR54.jpg
    64.1 KB · Views: 77
  • GR53.jpg
    GR53.jpg
    101 KB · Views: 72
Last edited:
OP
N

NUTTSGT

Super Moderator
Staff member
Joined
Sep 14, 2009
Messages
50,806
Location
Northern Central Ohio
Re: garage refurb

I've been working too much lately to hardly anything done. I worked Thursday, Friday, off on Saturday and back in on Monday and Tuesday. Those were 24 hour shifts, sometimes it makes it difficult getting things done.

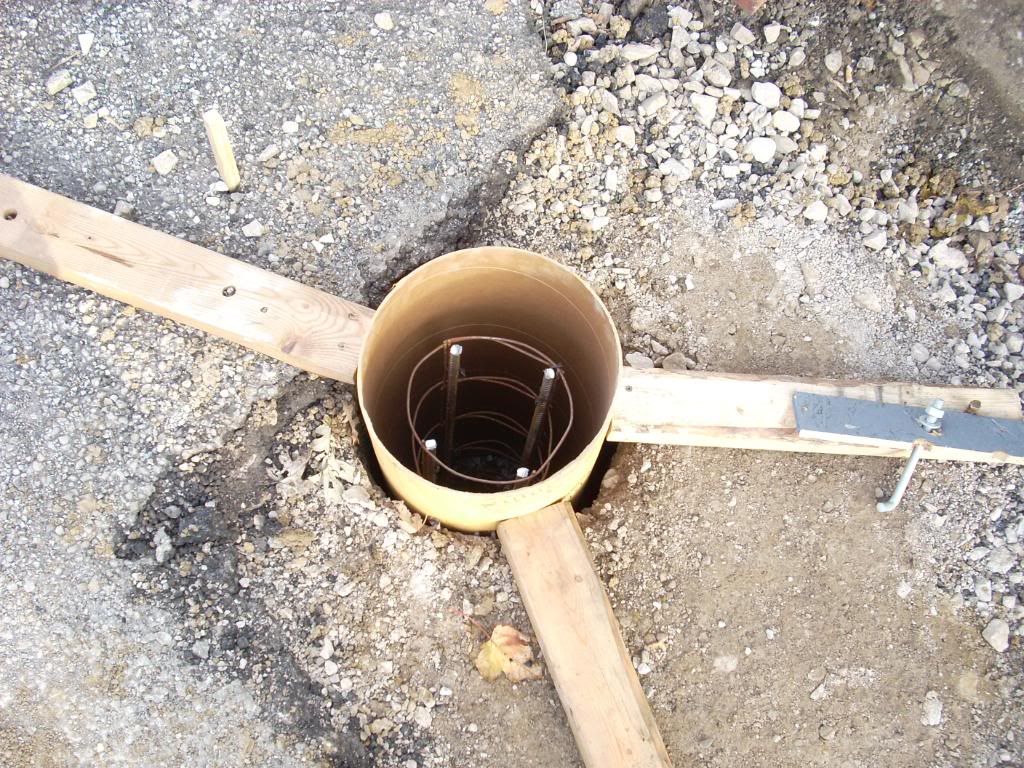
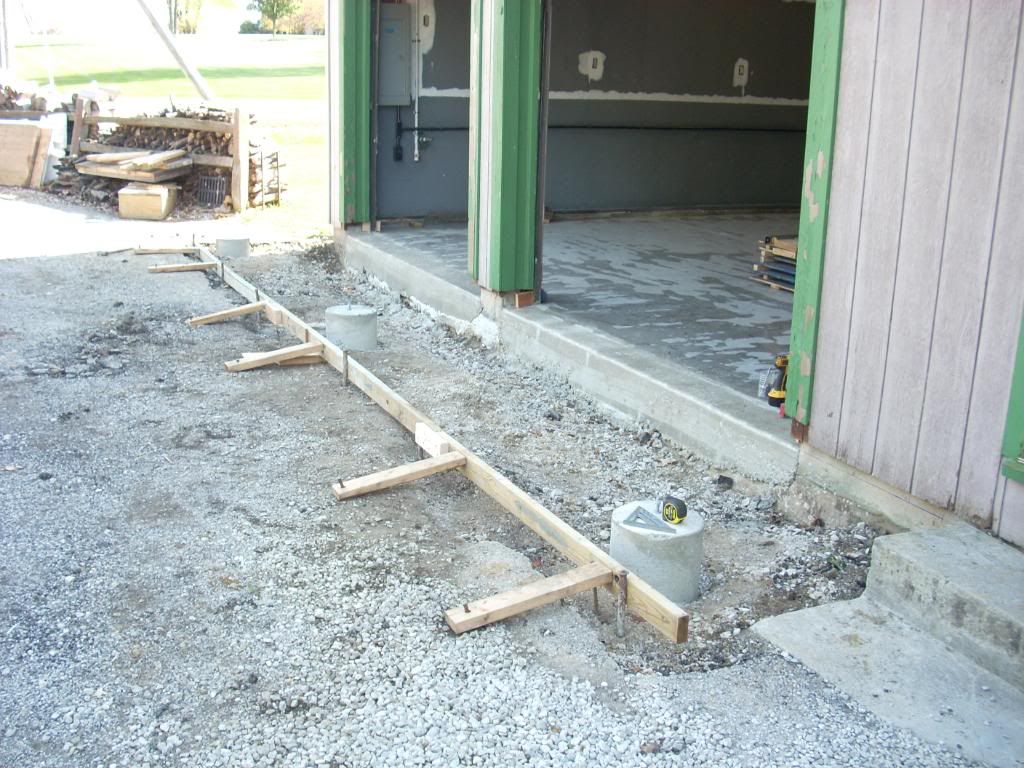
I dug the holes for the columns to sit on, for the future over hang. Dropped the rebar in and poured the concrete.
10132010garage002.jpg

Here's the reinforcement in side the tube forms.
10132010garage003.jpg


After they were poured, I tore off the cardboard tube down to ground level. I dug out more of the crappy black top and formed up the front of the apron.
10132010garage004.jpg
 

Attachments

  • GR55.jpg
    GR55.jpg
    147.4 KB · Views: 91
  • GR56.jpg
    GR56.jpg
    151.2 KB · Views: 101
  • GR57.jpg
    GR57.jpg
    133 KB · Views: 84
Last edited:
To avoid these ads, REGISTER NOW!
Top Bottom